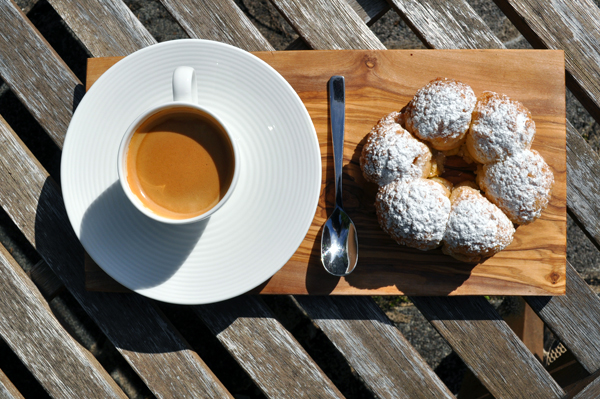
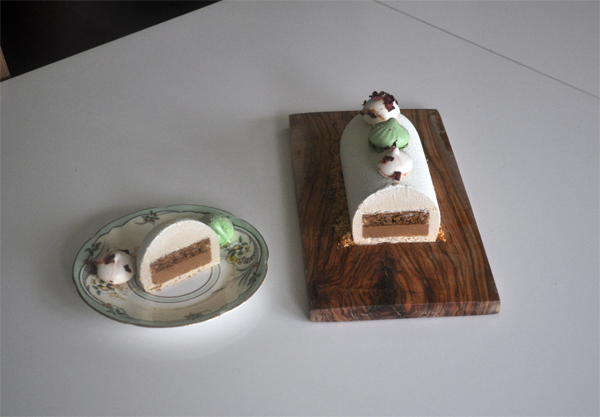
Coffee with Hazelnut Parkin
Italian meets Middle East on a trip to Yorkshire

I got pretty excited this Christmas ... a new drum machine, some comfy socks. Don't tell me you don't love a good sock, we all do.
One of the non-sock related items I received this year was a Silikomart Jr. Pillow. Now that January's finally up (phew) I've had a chance to road test it.
This recipe will seem like a bit of an odd ball, but stick with me - the flavours work really well together.
Putting ginger in coffee is common in Yemen and other parts of the Middle East, but was also done in 17th century England. Since I have a tiny amount of Yorkshire blood in my veins, I thought mixing up some Espresso mousse with Parkin would make a great combo. It's also served with those other classic babylonian coffee pairings - rose and cardamom.
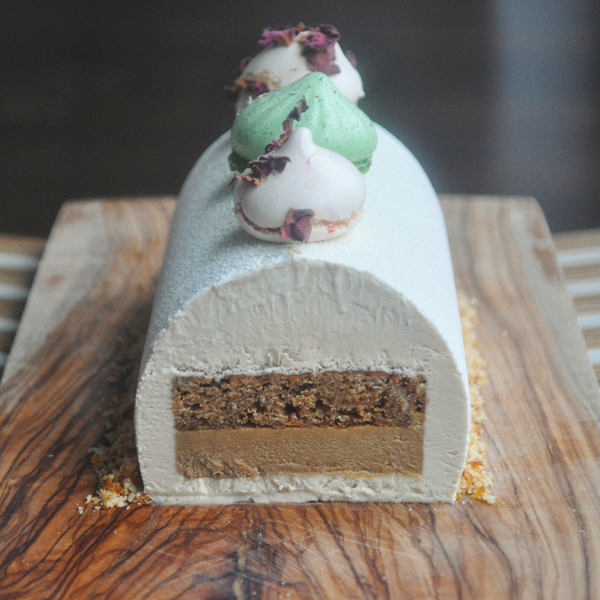
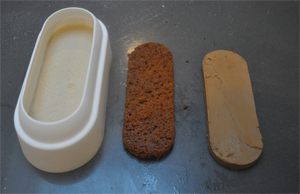
As noted, this recipe is based on a Jr. Pillow mould - but any cake or loaf tin about 20 cm long, 7cm wide and at least 5cm deep would work too.
Ingredients (Makes 1 individual cake, serving 6 people with lots of meringues and some parkin for the chef)
For the Hazelnut Parkin
- 50g blanched hazelnuts
- 100g unsalted butter
- 125g self-raising flower
- 20g caster sugar
- 20g muscovado sugar
- 40g treacle
- 100g golden syrup
- 1 tsp ground ginger
- 35g whole egg (approximately half a large egg)
- 5g whole milk
- Pinch of salt
For the white chocolate espresso bavaroise
- 60g freshly brewed espresso
- 65g full fat milk
- 125g white chocolate couverture
- 30g egg yolks
- 15g caster sugar
- 190g whipping cream
- 3g gelatine (about 1 1/2 sheets)
For the coffee Crème au Beurre
- 50g caster sugar
- 15g water
- 30g egg yolks
- 30g egg yolks
- 110g unsalted butter
- 10g espresso powder or instant coffee
For the white chocolate flocking
- 200g white chocolate couverture
- 140g cocoa butter
- 4 teaspoons of superwhite food whitener (optional)
For the cardamom and rose meringues (optional)
- 4 large egg whites
- 130g caster sugar
- 130g icing sugar
- 5 cardamom pods
- 1tsp rose flavouring
- Dried rose petals
- Red and green food colouring
Equipment required
- Jr. Pillow mould or similar
- Thermometer
- Piping bags and nozzles for plating
- Silicone mat
- Stand mixer
- Sieve
- Stick blender
- Spray gun
Make the parkin
This is the best bit, as your kitchen will smell unreal.
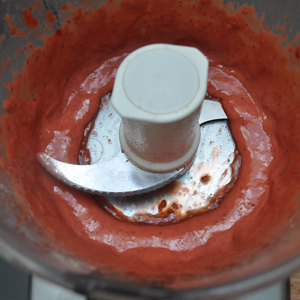
Roast the hazelnuts at 200C for around 10 minutes, then crush roughly with your rolling pin or whizz quickly in a food processor.
Pre-heat the oven to 140C, then line a small brownie tin with greaseproof paper and some baking spray (or butter if you don't have any).
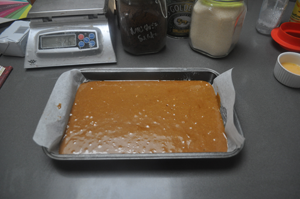
Place the butter, treacle, sugars, golden syrup and salt in a pot and, over a medium heat, stir until it's a thick liquid. Remove from the heat and leave to cool slightly.
Sieve the flour into a bowl, then add the ginger and roasted hazelnuts. Pour the sugar liquid over and beat with a spatula until it's all combined. Finally, beat in the egg and milk, then pour the lot into the tray.
Bake for 50 minutes, then remove from the oven and leave to cool completely.
Make the coffee Crème au Beurre
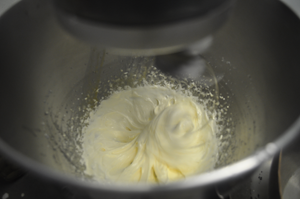
Place the egg yolks in the bowl of your stand mixer and whisk until pale. While this is happening, put the caster sugar and water in a pot, and heat to 121C
As soon as you're up to temp, carefully pour the syrup over the yolks and leave to whisk until it gains volume and is reasonably cool
Start adding the butter, piece by piece, with the whisk still running.
When all the butter has combined, take your espresso powder or instant coffee and blend it with a small amount of water to form a paste. Pour this into the mixture, and continue to whip until everything is combined.
Take your butter out of the mixer, and place into a tray of some sort - I used another brownie tin. Using a spatula or palette knife, form the butter into a block the same size as your mould. It should be around 1cm tall. Place in the fridge to firm up while you continue.
Make the espresso bavaroise
Soak the gelatine in cold water and set aside. Weigh your milk and espresso out into a heavy bottomed pan.Weigh out the white chocolate into another bowl with a fine sieve on top, and again set aside.
In a 3rd bowl, place the egg yolks and whisk them with the caster sugar until they become pale. Finally, get your thermometer ready.
Put the espresso milk over a medium heat until boiling. Carefully temper the egg yolks by pouring a little milk over them while whisking. Continue to add more until all the milk has been combined with the yolks.
Pour this back into the pan and keep stirring with a wooden spoon. Read the temperature - raise it until the thermometer reads 82 degrees C then immediately squeeze the liquid off the gelatine and whisk in. Pour the mixture through a sieve onto the chocolate. Let this sit for a few minutes, then use a stick blender to blend everything to ensure it's totally smooth.
When you're happy it's all blended, set aside in the freezer for 10 minutes to firm up.
Remove from the freezer, and whip the cream until quite thick - enough to hold its shape for a few seconds if you drop some from a spoon. Fold the cream into the custard.
If you're using the Jr. Pillow, pour the bavaroise up to the half way point of the mould. If you're using anything else, fill your loaf tin or other mould up to around 1.5 cm. Place in the freezer for at least an hour and reserve the rest of the bavaroise at room temperature. You might need to beat it now and again to stop it from setting during the hour.
Forming the rest of the cake
Remove the mould from the freezer. Again if you're using the Jr. Pillow it has a cutter in the top of it which allows you to chop out layers that fit inside it (yes, it's massively cool). Take this cutter and chop out identical pieces of parkin and the Crème au Beurre.
If you're not using the mould, measure and cut pieces of both layers which are around 1cm less wide than your original bavaroise layer.
Either way, place the Crème au Beurre on the parkin and line them up, then put them in the centre of the frozen bavaroise. Pour over the remaining bavaroise, making sure it drips down the sides and into any un-filled spaces. Put this back in the freezer for another hour or two to set.
Make the meringues (optional)
This bit's optional, but the meringues are delicious so I'd recommend it if you have time
Pre-heat your oven to 110C.
Place the egg whites in the bowl of your stand mixer and whisk until soft peaks form. Shower in the caster sugar at this point, then keep whisking until the meringue is glossy.
Stop the mixer, then sieve in the icing sugar. On the lowest speed, whisk again for 15 seconds (so the sugar doesn't fly up in the air) then push the speed up to max for another 30 seconds until the sugar is fully combined
Split this mix between two bowls then add red colouring to one, green to the other. Pour your rose flavour into the red mix. For the cardamom, split the pods by bashing them in a pestle and mortar. Remove the shells, then bash again until a reasonably fine powder is formed. Place half the powder into the green bowl and mix thoroughly.
Put each mix in a piping bag with whatever nozzle you prefer, then pipe small meringues onto silicone trays. Cover the rose ones with dried rose petals if you have some, and dust the cardamom ones with the remaining cardamom powder.
Place in the oven for an hour, then remove and leave to cool
Spray
Put the chocolate, cocoa butter and superwhite (if using) in a heatproof bowl and place over a simmering pot of water.When everything looks completely melted, blend with your stick blender just in case then pour into your spray gun.
Take out a big box - a 12-hole wine box is a good size - and cut off top flap. Lay it down so you have flaps on the left, bottom and right. Place a chopping board in the box, then put a layer of greaseproof paper on top.
Remove the cake from the freezer, and release it from the mould.
If you're ready to spray, put your cake in the box and turn on the gun. When flocking, I normally rotate the cake 3 times to make sure it has built up enough.
Return to the freezer to harden.
Reserve any unused spray for another time (it keeps quite well for a month or so in an airtight box).
To serve
Remove the cake from the freezer around an hour before you want to eat. If you want to cut slices, I'd recommend not doing that any later than 30 mins after it has come out of the freezer or it will start to melt.
Serve slices with the meringues on the side (if using) and enjoy this act of randomness.
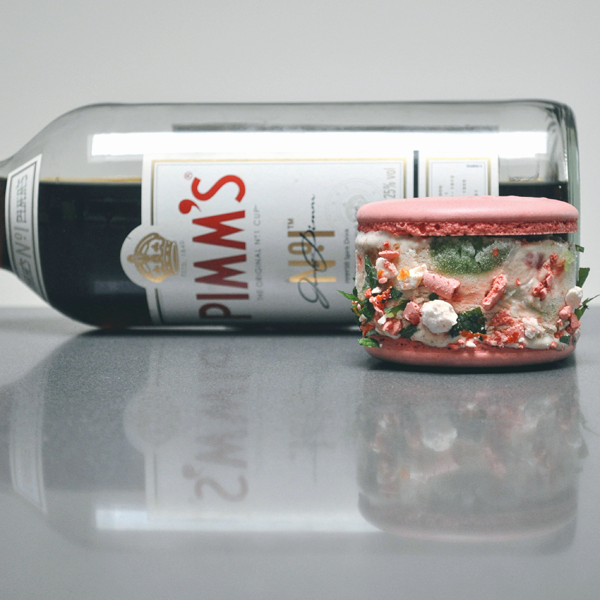
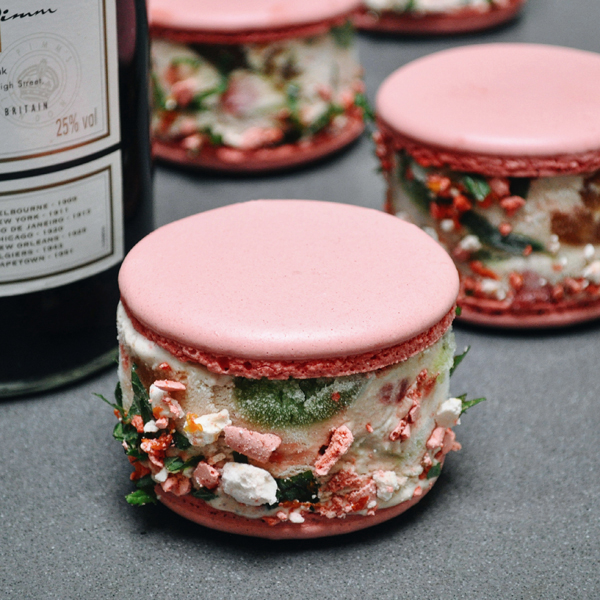
Pimms Sandwich
The weather is as British as ever; so have some ice cream.
Ah, British Summer. Rain, wind, stifling heat, mixed with the odd day of glorious sunshine. As my Father (who still professes to have just stepped off a plane despite having lived here for 50 years) succinctly puts it - Britain has four seasons; Winter, Winter, Winter and Winter.
One thing's for sure; I wasn't risking a barbeque this weekend. Instead, it was Beef Wellington & bone marrow gravy for main, and these ice cream macaron for dessert.
They are a combination of a cucumber & gin sorbet, soft Pimms and mint jellies, roasted strawberry ice cream and crunchy meringue pieces. Roasting the strawberries not only intensifies the flavour, it also reduces the liquid content so that the ice cream can still set but give off a good strawberry kick.
There are quite a few processes, so I've tried to lay them out in an order that will allow some overlap during wait periods. It's a lot of effort - but if you're into your ice cream macs, and rainy days, you'll love these.
Ingredients (makes 8 individual macs with a couple of shells left over for the chef)
For the Pimms & mint jellies
- 3 Gelatine leaves
- 100g Caster Sugar
- 125g No. 1 Cup
- 25g fresh Mint leaves
- 10g Liquid Glucose
- 200g Water
- 100g Soda Water
For the roasted strawberries
- 250g strawberries (weighed as hulled)
- 1tbsp Balsamic Vinegar (sweet aged if you have)
- 1tbsp Golden Syrup
- 2 twists of black pepper
For the macerated strawberries
- 100g chopped strawberries
- 10g caster sugar
- 20g Pimms No. 1
For the cucumber & gin sorbet
- 2 large cucumbers, skin on
- 2 lemons
- 120g Icing Sugar
- 30g London Dry Gin
For the macaron shells
- 150g Ground almonds
- 150g Icing sugar
- 110g Egg whites
- 150g Caster sugar
- 37ml Water
- 3g Red powdered food colouring (Americolor)
For the roasted strawberry ice cream
- 100g puree (from the roasted strawberries)
- 150ml Whole Milk
- 150g Caster Sugar
- 5 egg yolks
- 1tsp Vanilla Powder
- 500g Double Cream
- 20g Pimms No. 1 Cup
For the meringues
- 2 Large Egg Whites
- 65g Icing Sugar
- 65g Caster Sugar
- 2g Red powdered food colouring (Americolor) - optional; you can just leave them white!
For the roll coating
- Freshly grated peel of two large oranges
- 10g Mint leaves
- Reserved meringues
Equipment required
- 8cm circular cutter
- Ice Cream machine
- Stand mixer
- Thermometer
- Plastic piping bag and large piping head
Turn your Ice Cream maker on to start chilling, and pre-heat your oven to 190 degrees C.
If you have a double oven, pre-heat the other one on to 140 degrees C.
Make the jellies
Put the gelatine sheets into some cold water to soften.
Weigh out your 200g of normal water into a heavy bottomed pot, pour in the sugar and liquid glucose. Bring this to the boil over a medium-high heat, and hold it there for 5 minutes.
Take the pot off the heat, and let it cool to around 60 degrees C. Take the mint, finely chop, then add to the heated liquid. Don't be tempted to add the mint while it's too hot, or you'll end up with mint tea. Nobody wants that.
While the liquid is still warm, squeeze off the excess water from the gelatine then add that to the pot and mix thoroughly. Finally, pour in the Pimms No. 1, the soda water and mix well.
Take a tin - something like a square brownie tin - and line it with two sheets of cling film so it covers all sides. Pour in the liquid, then leave to set in the fridge for an hour or so.
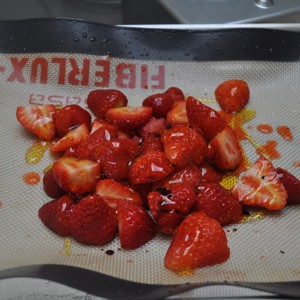
Roast the strawberries
Put the hulled strawberries on a silicone mat. Twist over the black pepper, then pour on the balsamic vinegar and golden syrup.
Put the mat into a tall-sided tray then put it in your oven, pre-heated to 190 degrees C, and roast for 40 minutes. Give them a turn at 20 minutes just to make sure all the sides are roasting evenly.
When time's up, remove from the oven and let cool slightly - don't leave them for long or you might end up with a solid block. Put them in your food processor or blender, and whizz until you have a puree. Reserve 100g for the ice cream.
Make the macerated strawberries
This is the easy bit; place the chopped strawberries in a bowl, cover with sugar, pour in the Pimms and mix with a spoon to combine. Leave at room temperature for the rest of the time it takes you to complete the recipe.
Make the cucumber and gin sorbet
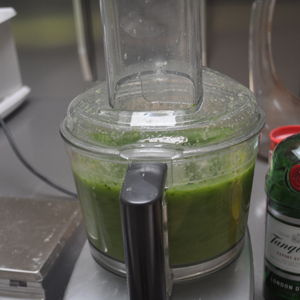
Split the two cucumbers down the middle, then use a teaspoon to scrape out the seeds from the middle. Roughly chop, leaving the skin on, and put into a food processor or blender.
Weigh in the Icing Sugar, and finally squeeze the juice of two lemons into the food processor's bowl.
Blend this for 10 minutes, to try and extract as much flavour as possible.
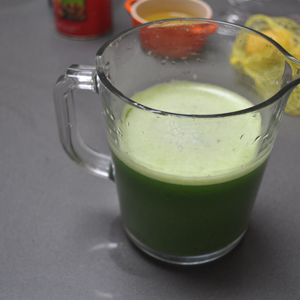
When time's up, use a fine sieve and pour the puree through so that you're left with only the liquid. Mix in the gin.
Pour the mix into the Ice Cream maker bowl, and churn until you have a sorbet. When it's ready, transfer to a disposable piping bag and reserve in the freezer.
Make the macaron shells
I'm going to be lazy here - please follow my instructions for making macaron shells here, here or here.
Once you get to the piping stage, remember that these need to be bigger than your standard macaron shells. We want the end size to be around 8cm - so I'd say pipe to about 4cm and then tap to spread.
Once the shells have baked, set aside to cool and turn the oven down from 140 degrees C to 110 degrees C.
Make the meringues
Beat the egg whites in your stand mixer until soft peaks form - normally less than a minute on a Kitchen Aid up at full whack. Slowly shower in the caster sugar, then leave it running on high for about 10 minutes until you have stiff peaks.
Turn the mixer down to low. If using, sprinkle in the powdered colouring, followed by the icing sugar. Give it a quick 30 seconds on high, then turn off and transfer to a piping bag.
Take a baking tray, and place a silicone mat on top. Pipe any shapes you like - we're just going to crush them - but make sure they are reasonably small so we get a good amount of crunchy shell rather than sticky innards.
Place in the pre-heated 110 degrees C oven, then cook for 60 minutes.
When done, remove and allow to cool before crushing roughly.
Make the roasted strawberry ice cream
Place the 150g of milk in a heavy bottomed saucepan, add the caster sugar and vanilla powder. Measure out 500g of double cream (fridge-cold) into a bowl, and put a sieve on top. Place the egg yolks into another bowl and whisk for 30 seconds. Pour the 100g of puree into a second saucepan (so that it's warm too and doesn't split the mix).
Gently heat both the milk and the puree. When the milk comes to the boil, temper the eggs by pouring a little over them while constantly whisking. Pour a little more, then whisk again. Repeat until all the milk has been combined with the egg yolks, then pour the lot back into the saucepan.
Keep heating over a low heat, stiring with a wooden spoon. Eventually, it will slightly thicken - just so that when you run your finger down the spoon, it will leave a trace. When it reaches this point, turn off the heat and pour in the warmed puree. Stir again to combine, then pour through the sieve into the cold cream.
Mix again, much more vigorously this time. When everything looks mixed nicely, pour directly into the pre-chilled ice cream maker and churn. There's no need for any of this "put the mix in the freezer for 24 hours before churning" nonsense; there never is.
Sieve the liquid off the macerated strawberries - which is now a nice sugary Pimms flavour - and drop this into the ice cream bowl too. Finally, weigh out your final 35g of Pimms and pour it in.
After 30 minutes to an hour, just before it completely churns, drop in the macerated strawberries, and about half of your crushed meringues.
At this point remove your cucumber sorbet from the freezer to warm up a little.
Setting the components
Nearly there!
Now that your ice cream has churned, line a tin or try tray that's around an inch or so tall with cling film. Use a spatula to transfer the ice cream in.
Next, pipe 3 even lines of cucumber sorbet into the ice cream so that they run the length of the tray.
Take your set jellies out of the fridge and roughly chop about half. Press the pieces into the soft ice cream, around the cucumber.
Cover with another layer of cling film, then put back in the freezer.
Putting it together
Chop the mint into ribbons, and grate the oranges into a bowl. Crush up some of the meringues.
Remove the tray of set ice cream from the freezer, and cut 8 circles out, trying to get a line of cucumber sorbet inside each one.
Working quickly (it's a soft ice cream!) put a toothpick or fork in the top of each cut circle, then roll the edges in the mint-orange-meringue mix to coat. Place onto a macaron shell, then cover with a second shell. Place back in the freezer immediately and repeat with the remaining 7 ice creams.
When you're ready to serve, remove from the fridge for 10 minutes then scoff. Perhaps with a glass of Pimms. Or even better, straight gin; you might need it after all that work.
Apple Butter & Toffee Apple Macaron
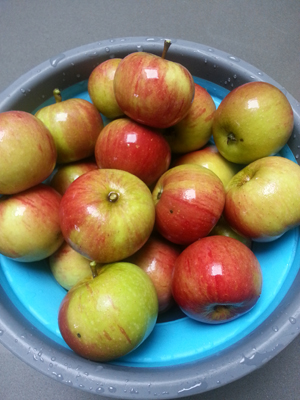
The apple overload begins

Our fig and plum trees have had a bad year this year, but the alternating wet / hot weather has really suited apples and blackberries in the garden. Our Granny Smith tree is yet to be picked, but I've brought in the first crop of a strange Pippin hybrid. We don't actually know what variety of apple it is - not super sweet, but not sour like a Cider apple. In any case, we have loads - far too many to eat out of hand.

One of the best things to do with too many apples (my parents' are currently picking about 100 a day in their garden) is to make Apple Butter. This is a slight misnomer, as it doesn't contain any butter or dairy ingredients - it's named after its smooth texture.
Apple Butter's origin lies in the Netherlands, and transferred to America where it's still popular - but is rarely found here in the UK. It's a great way to get 3 to 4 weeks life out of apples that would otherwise be wasted.
Uses are far reaching - have it on toast, with or without cheese. As part of your cheese course instead of quince paste. Add it to cocktails or ice cream ... or use it as an ingredient to make something else; in this case, Toffee Apple Macarons.
The recipes for both are below - you can make the apple butter with (as is traditional) or without spices; here I've opted for without so that it's more flexible as a cooking ingredient.
Apple Butter
Ingredients
- 1kg apples
- 100ml water
- 140g to 160g caster sugar
- 1 tbsp lemon juice
If adding a spice mix
- 1 star anise
- 2 tsp ground cassia bark or cinnamon
- 1/2 tsp ground cloves
- 1/2 tsp ground ginger
Equipment required
- Slow cooker
- Sieve
- Hand blender or food processor
- 700ml sterilised jar (Kilner style if possible - to sterilise your jar, upturn it in an empty dishwasher and perform a hot cycle without soap or tablet)
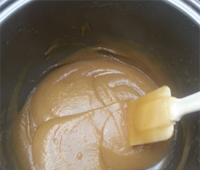
Wash the apples, then core but leave the skin on. Quarter them, and place in the bowl of your slow cooker with about 100ml of water. My slow cooker only has one setting (its primary use is for cooking rice) so just set it as high as it goes and close the lid. Cook the apples for 4 hours in total, stirring every 30 minutes to make sure nothing's catching and to help them break down.
By the end of the cooking time, the apples and their peel should be pretty much disintegrated into pulp. Transfer to a bowl, and use a hand blender to purée the apples as finely as you can. This may take 5 to 10 minutes. When happy, place your empty slow cooker bowl onto a weighing scale and zero it. Put a relatively fine sieve on top and pass your purée through the sieve into the slow cooker bowl (a bendable silicone bread scraper is useful here).
Weigh the purée - it should register somewhere between 700g and 800g. Now add the sugar - this is down to your taste preference, and also depends on how sweet your apples were to begin with. If they are a sweet variety, or you want a more tart butter, add 10g per 100g. Due to the slight sourness of our apples, I've gone for 20g for every 100g - so if you have 700g of puree, add 140g of sugar. It's personal preference; but the 20:100 ratio will give your butter a longer shelf life. Add the lemon juice (which also helps preserve the finished product) and, if using, stir in the spices.
Put the slow cooker bowl back in the slow cooker, set as high as it goes again, close the lid and leave for a further hour - this time stirring every 15 minutes to prevent catching.
After the hour is over, transfer to a bowl to cool. If you've used star anise, don't forget to remove it now. Pour into your sterilised jar - from the 1kg of apples you're likely to fill a jar with a capacity of 700ml.
Store in the fridge - it should last 3 to 4 weeks.
Toffee Apple Macarons
Ingredients (makes 12)
For the macaron shells
- 150g Ground almonds
- 150g Icing sugar
- 110g Egg whites
- 150g Caster sugar
- 37ml Water
- 3g Green powdered food colouring (Americolor)
For the filling
- 100g Caster sugar
- 125g Unsalted butter
- 3 tbsp Apple butter
- Pinch of salt
Equipment required
- Food processor
- Stand mixer
- Thermometer
- 2 baking mats
- 2 heavy trays
- 2 disposable piping bags and 1cm nozzles
I use the Italian meringue technique by Pierre Hermé to make the shells - but everyone has their own tweaks to get consistent results at home.
Start by preparing everything - have your baking mats on some heavy trays, get out the piping bag and place the nozzle inside. Measure out the 150g of caster sugar and 37ml of water into a small pot and place on your stove top with a thermometer inside. Measure out 55g of your egg whites into the bowl of a stand mixer, and connect the whisk attachment
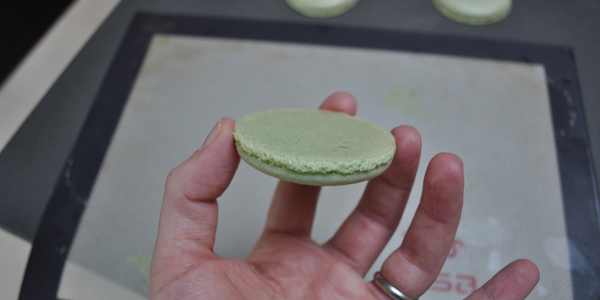
Now put the 150g of icing sugar in the bowl of a food processor, followed by the 150g of ground almonds (putting the sugar in first helps to stop it leaving the processor in a cloud of dust). Blend for a few minutes to make sure everything is as fine as possible. At this point, tip the mix into a new bowl (one big enough to fix this mix and the meringue later) and re-weigh to make sure you have exactly 300g of dry ingredients. Top up if necessary. Take the remaining 55g of egg white and place in a small bowl, then add the green food colouring and mix. If you can't find the powder colour, paste is the next best thing. Avoid liquid food colouring if you can, as they tend to dilute the mix too much. Pour this mix on top of your dry ingredients and set aside.
Start to heat your sugar / water mix in the pot over a high heat. Keep going until you hit around 112 deg C. Turn on your stand mixer to a medium high speed to get the whites whipping - remember not to go too mad with the speed at this point; you don't want stiff peaks nor soft ... somewhere in between is perfect. As the temperature of the sugar / water mix hits 118 deg C exactly, quickly remove from the heat, push up the mixer to high and slowly trickle the hot syrup onto the whipping egg whites in one smooth motion. Now leave the whites whipping until much cooler. If you raise the whisk and the meringue drips off quickly, don't despair - you've probably not left it mixing long enough, so just keep going until it comes away on the whisk and pretty much stays there.
Take a spatula and transfer all of the Italian meringue you've just made into the bowl with the dry ingredients you prepared earlier. Fold with the spatula until you get the desired consistency - to me, this is the crucial point where things can go wrong, and it's really hard to actually explain or even take a photo of the correct consistency. All I can say is that if you drop the mix from a spatula, and it doesn't re-absorb into the mix without trace in about 15-20 seconds, it needs more mixing. If it's more liquid than that, and just flies off the spatula, it's game over for you. Pierre describes it as "slightly runny cake dough". Make sure you get right to the bottom of the bowl though, or you may leave unmixed colour or ground almond at the bottom.
When ready, hold the piping bag and fold the top of it over your hand. Use the spatula to transfer the mix inside, then twist the top (put a kitchen clip on it if you like - I've lost mix many times by wandering aimlessly around the kitchen, not realising batter is dripping out behind me) cut off the end and get ready to pipe. I always have a bit if kitchen roll ready to clean the nozzle if too much mix clogs around it. This helps you pipe more perfect circles.
On the baking mats (and I would advise the Silpat-style ones over silicone, and both of those over just using greaseproof/baking paper - much easier to get them off later) pipe a row of 3.5cm rounds, keeping your nozzle as straight as possible. Keep about an inch between each round; you don't want to overcrowd the shells. Move to the next row, and pipe under the spaces you've left between the rounds on row 1. Carry on until you've filled the mat, then rap the baking tray on your work surface with relative force a couple of times. This helps to settle the batter, and is important not to forget. The French pros always do a little "whip" at the end of each pipe to stop the nipple effect (when a bit of the batter sticks up in the air), but in general I find these subside when you rap the trays. If not, you can use a wet finger to gently smoothen out any stray batter.
Repeat with the other mat so you have two full sheets. Turn your oven on to 140 deg c, set the sheets aside in the kitchen for 30 minutes to form a skin while you make the filling.
Weigh 25g of your unsalted butter onto a plate, put 3 tbsp of Apple Butter on a separate plate, and put both next to your stove top. Place the 100g of sugar into a heavy-bottomed pot. Never use a non-stick or black-coloured pot to make caramel! Use a medium heat to melt the sugar, and keep going until it becomes an amber colour with a hint of smoke emanating from the pot. As soon as it hits this point, immediately slide in the butter and use a spatula to constantly stir the caramel - it will bubble up, so be careful; sugar will burn you badly at this temperature. When the butter has been incorporated, drop in the Apple Butter and mix again. Pour the mix into a separate bowl and allow to cool.
Take the remaining 100g of butter, and put the beater attachment on your stand mixer. Beat the butter until it's completely smooth, which can take only 30 seconds on a high speed. Make sure you don't over-churn the butter though. When the caramel mix is cool, put the mixer on a medium low speed, and start to mix it into the butter a tablespoon at a time. You may not need all of the mix, or you may need the lot - as it blends in the mixer, look for a "whipped" consistency and taste it as you go to make sure you're happy with the flavour. When ready, transfer to another piping bag, twist or clip and place in the fridge to slightly firm up.
By now your oven should be hot, and the 30 minutes up. To test the shells, gently touch your finger on one; you should find that the skin has formed and won't leave batter on your finger. Place the trays in the oven, and set two timers going - one for 15 minutes, the other for 5. When 5 minutes are up, quickly open and close the oven door to release any steam build up. You'll be able to have a sneaky look at your macs at this point - you'll probably see the foot has already started to form. Don't leave it open long though, and re-set the timer for another 5 minutes. Repeat at the 10 minute mark then, after 15 minutes are over, test one of the macaron by seeing if it will come away from the baking mat. It won't just fall off, you need to slightly twist it. If there's any bend do it, leave it; they aren't ready. Carry on cooking for another 2 minutes and try again. You don't want to overcook your macaron, or you'll get a burnt colour and solid insides - so just repeat in 2 minute intervals until you can pull off one of the shells. When happy, remove from the oven. If you've got it slightly wrong, the shells will start to darken after about a minute out of the oven; this is caused by an undercooked inside - all is not lost; turn off the oven, and place the trays back inside with the door slightly open. This will gently cook the insides. Check them every minute - if all looks well, remove from the oven and allow to cool slightly on the mats.
What you're going for is a nice smooth base, raised foot and a soft slightly chewy inside. Obviously you can't check that last bit without eating one - though if you've piped an odd number of shells, you can always bite into one to test.
Peel each shell off and place on a cooling tray; if any get stuck, use a small spatula to slowly work around the foot, then under the shell to release it. If you're really good at piping, then all of the shells will be the same size. I never get it perfectly, so at this point will match up pairs of shells that are actually the exact same size. We're now ready to pipe - so take the filling out of the fridge and cut off the top of the bag. If the mix is too solid, leave until it's pipe-able. Squeeze a generous amount into the upturned centre of one of the shells, then place the other half your the pair on top, and press down gently until the filling starts to reach the sides. Repeat with all remaining shells and filling.
Now the really hard part - not eating them. Put the finished macaron into a box with a lid, and place into your fridge. After a few hours, they'll taste much better than when you first made them. Leave for at least 24 hours, and you'll get the best flavour and texture.
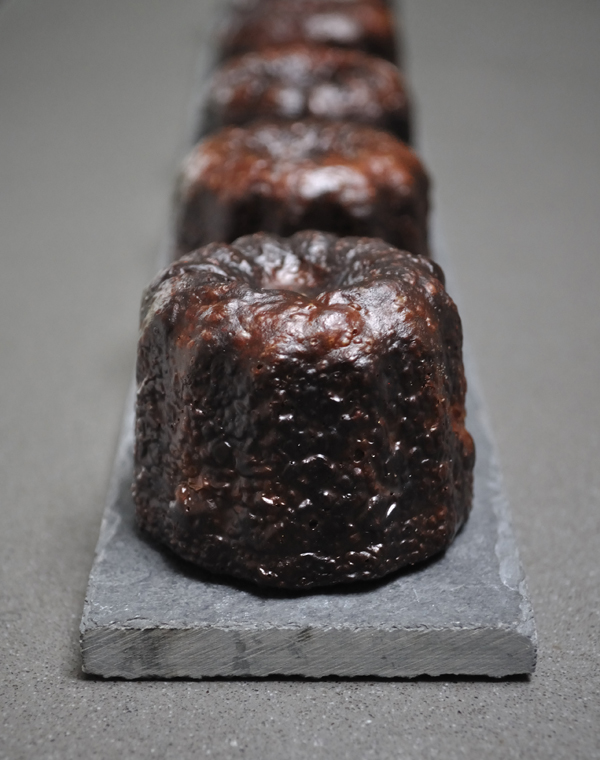
Honeymoon part 3: Saint-Émilion
... and Cannelés de Bordeaux
Most good things have to come to an end eventually, and the final part of our honeymoon took us from Lyon to the beautiful area of Saint-Émilion near Bordeaux. It's one of the oldest wine regions in France, dating back to when the Romans planted vines there in the 2nd century.
We stayed at an amazing guest house right in the middle of a vineyard, walked our way through the cellars of Château Guadet, and ate some fantastic food.

For the last part of this recipe mini-series, I thought I'd go with an appropriate favourite of mine - Cannelés de Bordeaux. I've been making these for a few years now, and there are two ways to go; one method will produce something delicious, the other something delicious and give you that traditional dark crust.
I must admit that I'd never eaten a real Cannelé from Bordeaux until we visited the area this year and, just like with Baba au Rhum, the French favour a younger, fruitier rum in their recipes. Still delicious, but I find the taste of a more spiced / sugar led rum such as Captain Morgan gives better results.
Ingredients (makes 32 large size Cannelés in 4 batches of 8)
For the mix
- 1L of whole fat milk
- 500g Icing Sugar
- 20ml Rum (Captain Morgan, Kraken or OVD are best)
- 200g Plain flour
- 100g Unsalted butter
- 3 Whole large eggs
- 5 Large egg yolks
- 2 Vanilla pods or 2 teaspoons of vanilla paste
For the baking
- 4 x 30g blocks of food-grade beeswax and 4 x 30g portions of unsalted butter or
- 120g unsalted butter
Special equipment
- 8 Copper mould, or a silicone equivalent
- An auto-funnel if you can get hold of one
Step 1: Make the mix
Put the milk into a large heavy-based saucepan with your vanilla, and bring to the boil over a medium heat. As soon as it hits boiling point, remove from the heat and slide in your butter to let it melt as the mixture cools.
In one bowl, lightly beat the eggs and egg yolks together. In a second bowl (one large enough to take the entire mix) gently sift your flour and icing sugar together, then put a tea towel underneath to help stop it from spinning around during mixing. Pour the eggs and rum into the sugar/flour mix and use a spatula to gently combine.
When your milk has cooled to the point where it feels just warm, start pouring this into the large bowl with the other ingredients, stirring with the spatula to combine as you pour. Try not to whisk the mix, but beat it enough so that there are no lumps.
Cover the bowl with cling film, and place in your fridge for at least 24 hours.
Step 2: Prepare the moulds
This recipe is for 4 batches of 8 - but if you have 16 moulds and two ovens, then you can scale it up. I'd not recommend baking more than 8 per oven though, as the initial cold of the moulds from the freezer and cooled mix will reduce the temperature too much.
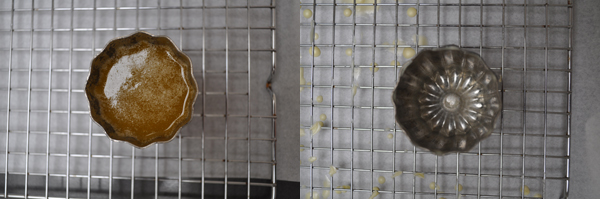
As I say, there are two ways to go here. If you just want a delicious Cannelé with a decent crust, then you can get away with a silicone mould coated in butter. You might get a "white bottom" doing this, but the taste will still be great. If you'd prefer to travel down the traditional route, you'll have to get some beeswax and a set of copper moulds. I bought mine from a French website some years ago - the price has gone up since then, but they do drop under 8 Euros when on offer.
The first thing to do depends on your mould type. For silicone, you want the butter to coat more thickly - so place the moulds in the freezer. For copper, you want the opposite; so place them in an oven at 200° C on a pair of stacked baking trays.
In either case, the next thing is to clarify your butter. Take 120g of unsalted butter and gently melt it down completely in a small saucepan, then let it cool very slightly. Skim off the fat floating on the surface with a spoon, then either gently pour the liquid butter from the pan into a jug, stopping as soon as you see the solids in the base of the pan come to the edge - or, if you have a muslin cloth to hand, pour it through that into the jug instead. You want to clarify the butter so that it doesn't burn in the high heat of the oven later.
Now you have the butter done ...
For Silicone:
Remove your moulds from the freezer and, working quickly, pour the (still slightly warm) clarified butter into the moulds, turn to coat then invert onto a clean tray to let the butter drip out. When they look coated, place them back in the freezer again for at least 20 minutes.
For Copper:
Get a pan of water on the boil, and place a metal bowl on top (bain-marie). Weigh one stick of your beeswax (these are normally 30g to 34g) and then measure out an equal amount of clarified butter. Pour the measured butter and beeswax stick into the bowl on the heat, stirring occasionally to mix the wax and butter.
While this is happening, place a piece of greaseproof paper on your worktop to protect it (beeswax is very annoying to remove) then place a cooling rack on top of that. Place another cooling rack to the side and, when ready, put the bowl of beeswax mix on that, and take the moulds out of the oven.
Working as quickly as you can, hold one mould with an oven mitt and pour the beeswax mix almost to the top. Immediately pour this back out into the beeswax bowl, rotating as you do to ensure it coats. Quickly invert this over the cooling sheet to allow any excess to drip out. Repeat this with the other 7 moulds as quickly as you can - you may need to re-heat the beeswax.
When dry, the thickness of beeswax coating should be almost invisible, as shown in the image below - you'll only really notice it if you rub your finger on the inside of the mould. Too thick and you'll get a mouth-full of claggy beeswax. Too little and the crust will burn rather than become caramelised.
Once you're happy with the coating, place the moulds in the freezer for at least 20 minutes, and place the stacked baking sheets back in the oven.
Step 3: Baking
Pre-heat your oven to 200° C. If you've followed the copper instructions above, you should already have a pair of stacked baking trays in the oven - if not, do that while your oven heats up.
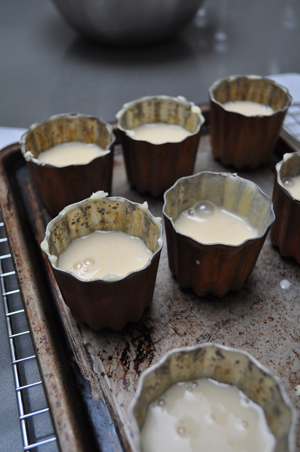
When you are ready to bake, take the mix from your fridge and gently stir with a spatula to combine any skin that may have developed on top. If you have an auto-funnel (and this really does make your life easier!) fill it up, or pour your mix into a jug and the moulds out of your freezer.
Fill each mould 2/3 of the way up, then take your stacked trays of the oven and put the moulds on top.
Bake for 40 approximately minutes in total - BUT the whole process requires that you keep an eye on the Cannelés.
For the first 20 minutes, open the oven door at 5 minute intervals; turn the tray to ensure even cooking and, most importantly, if they are puffing up past the top of the moulds you must remove the tray to the top of your oven for a minute to let them drop back. Stop the timer while doing this, and re-start when you put them back.
At the 20 minute mark, the shells should have stopped expanding and the crust started to form. Again, keep watch to ensure they don't burn (it's a fine line between dark crust and cremation).
When you think they're done, you should see they've come away from the sides of the mould, and there is likely to be a little smoke in the oven.
Immediately invert the moulds onto a cooling rack (if you find "white bottoms" you can put them back in the mould, then back in the oven for another 5 minutes) and leave to cool for at least 30 minutes.
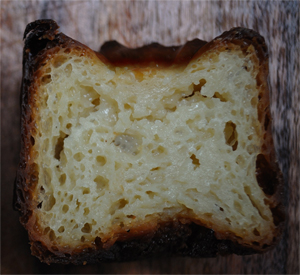
These really are one of my favourite pastries to eat, a kind of baked custard with a soft centre. Give it a try; every single person in your street will be knocking at your door asking what you're making.
Honeymoon part 1: Paris
... and the Paris Brest

Laura and I got married back in April, and as June rolled around it was finally time to take our honeymoon.
The journey started on the 14th, and took us from London to Paris, where we spent 3 days before moving to Lyon. After 2 nights in Lyon we flew to St. Emilion for the final part of our journey.
It was an unforgettable experience, and I thought I'd take a memory from each leg of the trip and try to re-create it at home.
While in Paris, we set out to visit as many pâtisseries as we could. One of the places I really wanted to see was La Pâtisserie des Rêves. It's an amazing place, and it was pretty hard not to try and buy everything in sight.

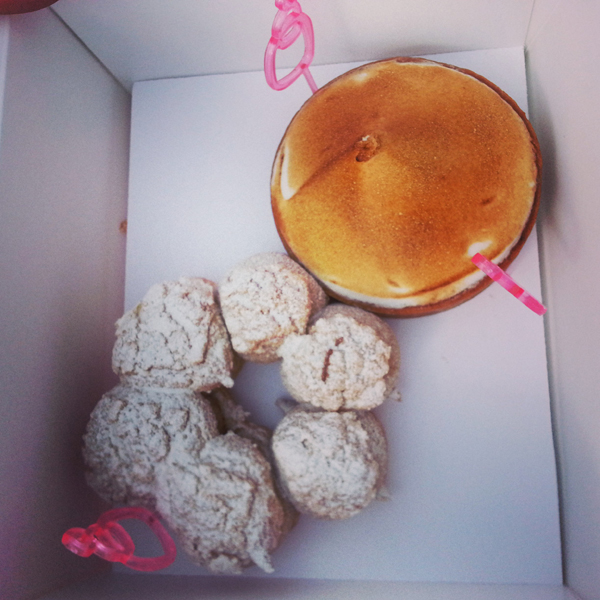
One of PdR's most popular pastries is their version of a Paris Brest. This light choux bun, filled with praline cream, is unbelievably good. The Paris Brest was invented in 1891 to commemorate a cycle race of the same name (which is why it's the shape of a wheel), and was said to find favour with the competitors due to its high calorie content. It stuck out from the rest as it's not something we often see in England.
We bought a lot of food that day, but chose to sit in the Tuileries Garden and share the Paris Brest in 30 degree heat with an espresso. True the hype, it was delicious - and inspired me to be the Parisian pastry I'd write about in the first of 3 France-related blogs.
The recipe below does take a bit of effort, but the end result is worth it for a pastry you're unlikely to find outside France.
Ingredients (makes 5 to 6 individual pastries depending on how large you pipe them)
Crumble
- 55g Strong white flour
- 55g Golden caster sugar
- 45g Unsalted butter
- Pinch of salt
Choux
- 80g Strong white flour
- 20g Plain flour
- 65ml Water
- 65ml Whole milk
- 55g Unsalted butter
- 5g Caster sugar
- Pinch of salt
- 3 Large eggs
Praline paste
- 80g Shelled hazelnuts
- 45g Blanched almonds
- 100g Caster sugar
Crème pâtissière
- 350ml whole milk
- 1 tsp vanilla paste
- 75g Caster sugar
- 15g Plain flour
- 15g Cornflour
- 3 Large egg yolks
Praline cream
- 100g Unsalted butter at room temperature
Step 1: Crumble
The first thing to make is the crumble topping, which is going to sit on top of our choux. It's a really important step that traps the steam inside the choux, allowing for a much better "puff". It also adds texture to the top of our end pastry.
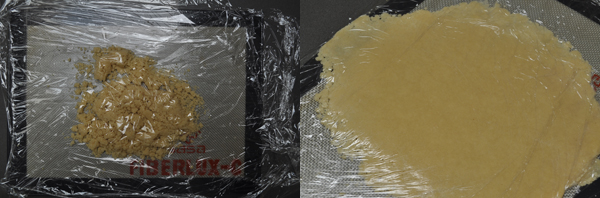
To make, simply blend all the ingredients in a food processor until you see a fine crumb texture. You really should use a processor for this stage, as you want to ensure a totally even distribution of ingredients throughout the mix. Lay a sheet of cling film out on your work surface, then pour the crumble on top and lay another sheet of cling on top of that. Take a rolling pin and gently roll the mix until it's 1 to 2 mm thick. Take this flattened mix, place on a tray and put it in your freezer for at least 45 minutes.
Step 2: Choux
This next step takes about 20 minutes, so make sure your crumble is nearly frozen before starting.
Set your oven to 180 degrees C, and place a shallow baking tray in the bottom. Fill your kettle and boil, then sift the two flours together and set aside.
Put the water, milk, sugar, salt and butter in a saucepan and heat until it reaches boiling point. Quickly take it off the heat, drop in your sifted flour, and quickly mix together with a wooden spoon until combined. Put this back on the heat, and cook - always stirring with the spoon - for about another 60 seconds. Tip this out into a bowl and leave for about 5 minutes to cool slightly.
When you're ready, take your 3 large eggs and crack them into a bowl. Beat together with a fork. This next step can be done by hand with the spoon, or you can put your choux base into the bowl of a stand mixer with the beater attachment. Pour in 1/3 of the beaten egg, and mix with the choux base. It's going to look like the mix splits almost immediately, but keep on going and that egg will eventually force its way into the flour mix! Repeat twice more so that all three eggs are combined.
A note about egg sizing at this point - this recipe calls for "3 large eggs" and often you'll see "4 medium eggs" in choux recipes. It's hard to judge, but I often find that there's some egg left over with 4 medium eggs. In any case, the key here is that the end choux should be of a dropping consistency - that is to say the mix will slowly drop from a spoon when picked up. You need to do this by eye - but 3 UK Large-size eggs does the trick for me.
Now you've made the paste, put a 1 cm piping nozzle into a disposable bag, and fill it with the choux. Take your frozen crumble out of the freezer, and find a cutter that's about 2cm diameter (bottle tops from drinks are quite a good size if you don't have anything else to hand). Cut 6 circles of crumble per Paris Brest - remember to peel off any cling film you might have cut out.
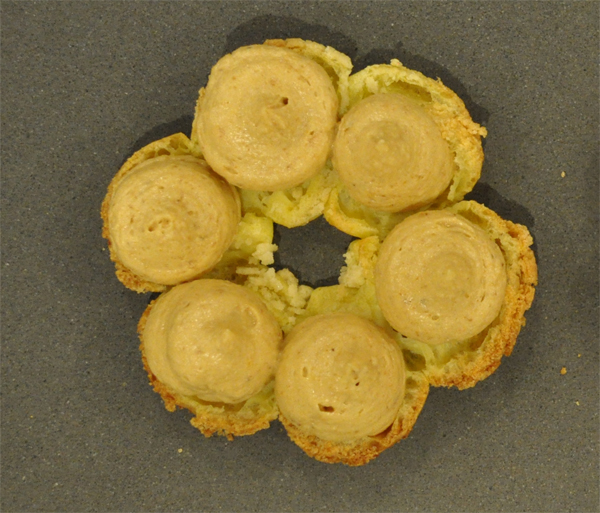
Take a baking tray, and either cover it with greaseproof paper or use a silicone mat if you have one. Pipe your first choux - it should be about 2.5cm wide and about the same height at the peak. What we're going for here is a hexagonal type shape, so the easiest thing to do in order to guide you is pipe another identical round, in a straight line, about 3 cm across from the first. That's the guide done, so now pipe the two upper parts of the hexagon to connect them, then the two lower parts. Now that you've piped the shape, take your crumble cut-outs and place one on the top of each choux round. Press them down very gently so that they all sit at approximately the same height. Repeat this process with your remaining choux paste and crumble pieces.
When ready to bake, put about a wine glass full of boiling water in the tray at the bottom of your oven, put the tray of choux in as well, and bake for 10 minutes. At the 10 minute mark, open the door of the oven briefly; the steam should mostly be dispersed at this point, and your choux risen. Close the door and bake for a further 10 minutes.
After the full 20 minutes has passed, take out the tray - the choux should easily come away from the silicone mat / greaseproof paper. Leave on a wire rack to completely cool. Leave the oven switched on for the next stage.
Step 3: Praline paste
Here in the UK, it's quite hard / costly to find praline paste. In any case, it's quicker to make your own out of things you might even have in your cupboard already. Take the hazelnuts and almonds, spreading them out on a tray. Place in a preheated oven at 180, and roast off for about 5 minutes. The amount of time you leave the nuts in your oven depends on how deep you want the flavour to be - less long for a less nutty praline, longer for stronger ... though obviously if you leave them in too long they'll burn, so keep an eye on them.
Once you've roasted the nuts, remove from the oven and spread out onto a silicone mat (or, again, greaseproof paper). Place the matt or paper onto a cooling rack so that it's not directly on your work surface.
Add the sugar to a heavy bottomed pan, and heat. We want a pretty deep amber colour caramel - so at the point you see the caramel start to smoke, it should be there. Pour the caramel over the nuts and leave to completely set.
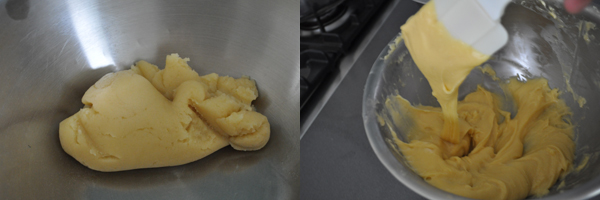
Once cool, use a rolling pin to gently break up the caramel into smaller chunks. Take the whole lot and carefully put it into your food processor. When you blend it initially, it will just look like dust - but carry on blitzing, and eventually the oils will be released from the nuts, and the consistency will turn to something resembling butter. This is your praline paste; you'll probably need about half for this recipe. It will keep in the fridge for a week or so.
Step 4: Crème pâtissière
Crack the egg yolks into a bowl, and add the sugar. Whisk until the yolks turn a pale colour, then sift in the flour and whisk again. Heat the milk and vanilla paste in a heavy bottomed saucepan until it boils. Remove from the heat, then pour a little of the hot milk on the yolk mixture to temper it, whisking constantly. Continue to add more of the milk mixture, whisking all the time. Eventually you should have mixed all of the hot milk with the yolk mixture - now transfer the whole lot back into the pan and place over a medium heat. Use a wooden spoon to continually stir, making sure you get right to the bottom of the pan. Your custard should thicken very quickly - but keep cooking until it's totally smooth and thick (it should take about 60 seconds). When ready, pour the custard into a clean bowl and put some cling film over the surface to stop a skin forming. I find cling is better than the icing sugar / cornflour dusting method, but normally pull one corner away from the custard to let heat escape.
Step 5: Praline cream and assembly
Place the 100g of butter in a stand mixer with the beater attachment fitted, and whip on a high speed until soft. Reduce the speed, and add half of your praline paste, making sure it blends completely (you'll want to scrape down the bowl). Keep the mixer running, and mix in the crème pâtissière. When the whole thing is amalgamated, taste the cream to see if it needs more praline paste or more sugar and adjust accordingly. Once happy, place a 1cm piping nozzle into a disposable piping bag and add the praline cream to it. Place this in the fridge to firm up. While you wait for this, go back to your cooled choux shells and carefully cut them in half horizontally. You may find that some of the individual shells come away from eachother during this process - but don't worry; they will all stick back together when you pipe the praline cream into the hollow shells. When the cream is firm, pipe enough into each of the 6 shells to fill it and come out half as high again.
Carefully place the shells back on top of the cream and push down slightly to settle. If you're not serving straight away, place them back in the fridge.
When ready to serve, dust with icing sugar and enjoy.