


Honeymoon part 3: Saint-Émilion
... and Cannelés de Bordeaux

Most good things have to come to an end eventually, and the final part of our honeymoon took us from Lyon to the beautiful area of Saint-Émilion near Bordeaux. It's one of the oldest wine regions in France, dating back to when the Romans planted vines there in the 2nd century.
We stayed at an amazing guest house right in the middle of a vineyard, walked our way through the cellars of Château Guadet, and ate some fantastic food.

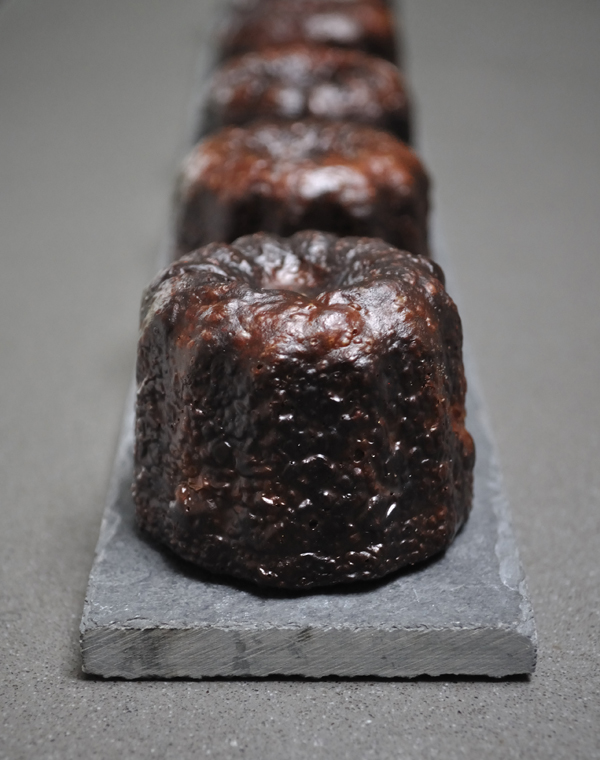
For the last part of this recipe mini-series, I thought I'd go with an appropriate favourite of mine - Cannelés de Bordeaux. I've been making these for a few years now, and there are two ways to go; one method will produce something delicious, the other something delicious and give you that traditional dark crust.
I must admit that I'd never eaten a real Cannelé from Bordeaux until we visited the area this year and, just like with Baba au Rhum, the French favour a younger, fruitier rum in their recipes. Still delicious, but I find the taste of a more spiced / sugar led rum such as Captain Morgan gives better results.
Ingredients (makes 32 large size Cannelés in 4 batches of 8)
For the mix
- 1L of whole fat milk
- 500g Icing Sugar
- 20ml Rum (Captain Morgan, Kraken or OVD are best)
- 200g Plain flour
- 100g Unsalted butter
- 3 Whole large eggs
- 5 Large egg yolks
- 2 Vanilla pods or 2 teaspoons of vanilla paste
For the baking
- 4 x 30g blocks of food-grade beeswax and 4 x 30g portions of unsalted butter or
- 120g unsalted butter
Special equipment
- 8 Copper mould, or a silicone equivalent
- An auto-funnel if you can get hold of one
Step 1: Make the mix
Put the milk into a large heavy-based saucepan with your vanilla, and bring to the boil over a medium heat. As soon as it hits boiling point, remove from the heat and slide in your butter to let it melt as the mixture cools.
In one bowl, lightly beat the eggs and egg yolks together. In a second bowl (one large enough to take the entire mix) gently sift your flour and icing sugar together, then put a tea towel underneath to help stop it from spinning around during mixing. Pour the eggs and rum into the sugar/flour mix and use a spatula to gently combine.
When your milk has cooled to the point where it feels just warm, start pouring this into the large bowl with the other ingredients, stirring with the spatula to combine as you pour. Try not to whisk the mix, but beat it enough so that there are no lumps.
Cover the bowl with cling film, and place in your fridge for at least 24 hours.
Step 2: Prepare the moulds
This recipe is for 4 batches of 8 - but if you have 16 moulds and two ovens, then you can scale it up. I'd not recommend baking more than 8 per oven though, as the initial cold of the moulds from the freezer and cooled mix will reduce the temperature too much.
As I say, there are two ways to go here. If you just want a delicious Cannelé with a decent crust, then you can get away with a silicone mould coated in butter. You might get a "white bottom" doing this, but the taste will still be great. If you'd prefer to travel down the traditional route, you'll have to get some beeswax and a set of copper moulds. I bought mine from a French website some years ago - the price has gone up since then, but they do drop under 8 Euros when on offer.
The first thing to do depends on your mould type. For silicone, you want the butter to coat more thickly - so place the moulds in the freezer. For copper, you want the opposite; so place them in an oven at 200° C on a pair of stacked baking trays.
In either case, the next thing is to clarify your butter. Take 120g of unsalted butter and gently melt it down completely in a small saucepan, then let it cool very slightly. Skim off the fat floating on the surface with a spoon, then either gently pour the liquid butter from the pan into a jug, stopping as soon as you see the solids in the base of the pan come to the edge - or, if you have a muslin cloth to hand, pour it through that into the jug instead. You want to clarify the butter so that it doesn't burn in the high heat of the oven later.
Now you have the butter done ...
For Silicone:
Remove your moulds from the freezer and, working quickly, pour the (still slightly warm) clarified butter into the moulds, turn to coat then invert onto a clean tray to let the butter drip out. When they look coated, place them back in the freezer again for at least 20 minutes.
For Copper:
Get a pan of water on the boil, and place a metal bowl on top (bain-marie). Weigh one stick of your beeswax (these are normally 30g to 34g) and then measure out an equal amount of clarified butter. Pour the measured butter and beeswax stick into the bowl on the heat, stirring occasionally to mix the wax and butter.
While this is happening, place a piece of greaseproof paper on your worktop to protect it (beeswax is very annoying to remove) then place a cooling rack on top of that. Place another cooling rack to the side and, when ready, put the bowl of beeswax mix on that, and take the moulds out of the oven.
Working as quickly as you can, hold one mould with an oven mitt and pour the beeswax mix almost to the top. Immediately pour this back out into the beeswax bowl, rotating as you do to ensure it coats. Quickly invert this over the cooling sheet to allow any excess to drip out. Repeat this with the other 7 moulds as quickly as you can - you may need to re-heat the beeswax.
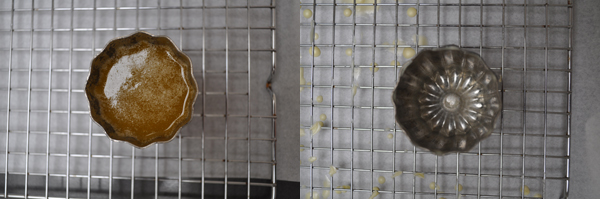
When dry, the thickness of beeswax coating should be almost invisible, as shown in the image below - you'll only really notice it if you rub your finger on the inside of the mould. Too thick and you'll get a mouth-full of claggy beeswax. Too little and the crust will burn rather than become caramelised.
Once you're happy with the coating, place the moulds in the freezer for at least 20 minutes, and place the stacked baking sheets back in the oven.
Step 3: Baking
Pre-heat your oven to 200° C. If you've followed the copper instructions above, you should already have a pair of stacked baking trays in the oven - if not, do that while your oven heats up.
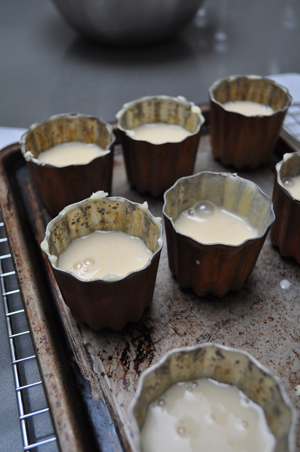
When you are ready to bake, take the mix from your fridge and gently stir with a spatula to combine any skin that may have developed on top. If you have an auto-funnel (and this really does make your life easier!) fill it up, or pour your mix into a jug and the moulds out of your freezer.
Fill each mould 2/3 of the way up, then take your stacked trays of the oven and put the moulds on top.
Bake for 40 approximately minutes in total - BUT the whole process requires that you keep an eye on the Cannelés.
For the first 20 minutes, open the oven door at 5 minute intervals; turn the tray to ensure even cooking and, most importantly, if they are puffing up past the top of the moulds you must remove the tray to the top of your oven for a minute to let them drop back. Stop the timer while doing this, and re-start when you put them back.
At the 20 minute mark, the shells should have stopped expanding and the crust started to form. Again, keep watch to ensure they don't burn (it's a fine line between dark crust and cremation).
When you think they're done, you should see they've come away from the sides of the mould, and there is likely to be a little smoke in the oven.
Immediately invert the moulds onto a cooling rack (if you find "white bottoms" you can put them back in the mould, then back in the oven for another 5 minutes) and leave to cool for at least 30 minutes.
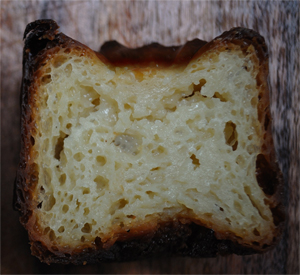
These really are one of my favourite pastries to eat, a kind of baked custard with a soft centre. Give it a try; every single person in your street will be knocking at your door asking what you're making.
Honeymoon part 2: Lyon
... and a Tarte aux Pralines

Lyon is a beautiful place - I actually enjoyed my visit there even more than Paris. I guess it was the relaxed atmosphere; it was supposed to be a holiday after all!
When we stepped off the train from a rainy (but warm) Paris, a wall of 33°C heat hit us. I was still wearing a leather jacket, and didn't take it off until we reached our apartment; I guess you can take the boy out of London ...
Our first outing was to a place that I'll remember for the rest of my life - to eat at, and meet with, the legendary Paul Bocuse. A lot of people complain that PB's flagship restaurant is stuck in the past - well yes, it's the epitome of classic French cuisine; but so what? That's exactly what we'd come for, and it was brilliant on every level. I can normally roll with the best of them in the gluttony stakes; but Paul Bocuse truly managed to finish me off. The words "here are the dessert trolleys - have whatever you want" should never be said to me.
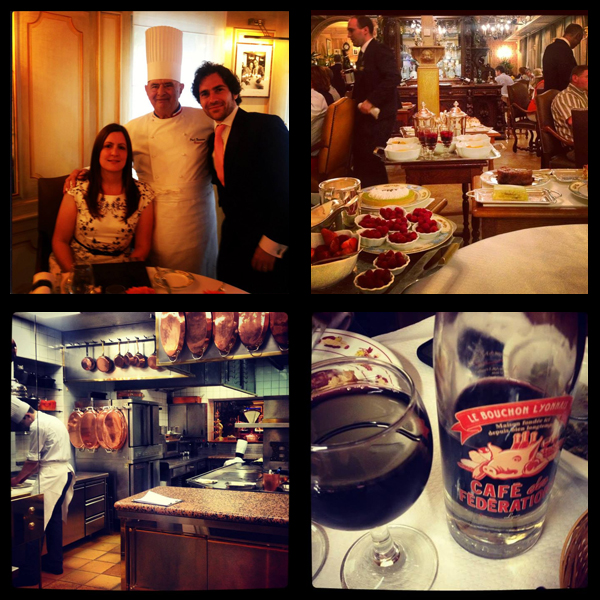
The next day, we visited Bernachon to try their signature President cake and Palet d’Or chocolates (likely the best chocolates I've ever eaten), then walked to Les Halles de Lyon Paul Bocuse for even further treats (and a spot with the famous Mrs. Sibilia).
That night, sadly our last in Lyon, we visited Le Café des Fédérations. On one hand it was the polar opposite of Bocuse; classic Bouchon food ... but in terms of enjoyment (and richness), it was almost as good.
While my sweet memories of Lyon will be the Palet d'Or and multiple Baba au Rhum, the recipe I've chosen for this part of the blog is probably the most classic Lyonnaise dessert of all; Tarte aux Pralines.
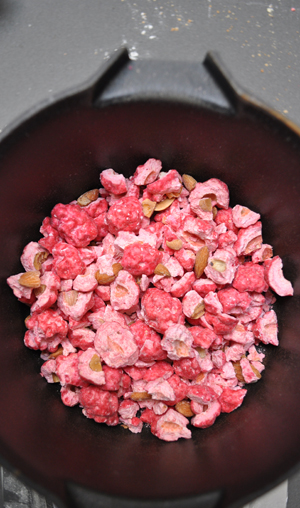
It's made of special red-sugar-coated almonds that you can pretty much only find in Lyon, melted and mixed with cream in a sweet pastry case. The recipe is simple so, if you can find them, grab a bag and give it a try.
Ingredients (makes 1 shallow 28cm tarte or a deeper 20cm one)
Sweet pastry case
- 250g Plain flour
- 75g Icing sugar
- 120g Unsalted butter
- 2 Large egg yolks
- 2 Tablespoons of cold water
- Pinch of salt
Filling
- 200g Lyon pink pralines
- 300g Double cream
Step 1: Make the case
Weigh out your butter and let it sit to come up to room temperature. Take the plain flour and gently mix with the icing sugar and salt on your work surface.
Make a well in the centre, and drop in the butter. Start to rub the butter into the flour/sugar mix with the tips of your fingers, gradually drawing in all the mix until you get a crumble-like texture.
When the butter is evenly distributed, make a well in the centre again and this time add the egg yolks and water. Mix with your fingertips again, drawing the mix in, and lightly pressing the ingredients together.
Try not to knead or heavily mix the ingredients, as you'll end up with pastry that shrinks when cooked. The point you should reach is when the mix looks yellow, but may not "come together" like a normal dough (in other words, it will be quite short).
Form into a ball, wrap in cling film and put in the fridge for 30 minutes to firm up.
When ready to prepare the case, take a sheet of cling film and lay it on your work surface. Take the pastry out of the fridge, unwrap and place in the centre of the cling. Use a rolling pin and roll out to a circular shape by rolling and quarter-turning the cling as you go. If you have a normal cling film, it will be about 30cm in width, so your pastry should come a touch over the edge. What we want is enough pastry to go up the sides of the flan ring, then very slightly over the top.
Line a baking tray (at least 30cm x 30cm) with a sheet of greaseproof paper. Take a 28 cm flan ring (don't use a tin; a flan ring produces much better results, especially on the base) and place this on the paper.
The next part is a bit tricky. Sometimes, if the pastry is still cold enough, you can just invert it with your hands or rolling pin and drop this onto the flan ring. Otherwise, you can take the flan ring, place it on the pastry and then invert the whole lot at once, placing it over the greaseproof paper.
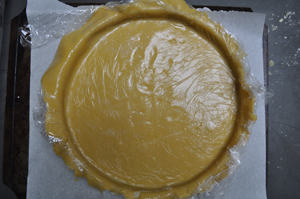
Either way, you should now hopefully be able to gently push the pastry into the base of the ring easily, as it's still coated in cling film. Push the pastry up the sides, and roll the little extra over the top so that it's outside the ring. Some people will trim the pastry with a rolling pin at this point; but I like to trim it after baking - just in case it has been slightly overworked and tries to shrink during cooking.
At this point, turn your oven to 170°C and put your baking stone in place (a pair of flat, stacked trays would also be fine if you don't have a stone). Remove the cling, prick the base of the case with a fork, and place this into the fridge for 30 minutes.
Step 2: Bake the case and make the filling
After 30 minutes have passed, take the case out of your fridge and carefully slide this onto your baking stone or trays in the oven (a baking peel makes this much easier). Remember to leave the greaseproof paper on the bottom!
This will take 25 minutes to bake; while you're waiting, make the filling.
Your pralines will come in a bag, and we need to crush them slightly - so batter them with your rolling pin. It's likely your bag will burst, so be careful.
When every praline has been smashed at least once, transfer to a heavy-bottomed pan and pour in the 300ml of double cream. Place this on a medium heat and place your thermometer in there too.
Gently stir the mix from time to time. When the temperature reaches 100°C, stir more constantly to get the red colour to come out of the sugar and blend with the cream. When the temperature reaches 104°C, remove from the heat and poor into a clean bowl.
This won't set too quickly, so leave it there until needed.
When your pastry case is cooked, remove from the oven and transfer to a wire rack to cool for 10 minutes. After it has cooled, use a small sharp paring knife to carefully make a straight edge on the pastry case. At this point, you should be able to gently spin the flan ring and carefully lift it off. There will probably be some pastry trimmings inside the case, and you'll want to get rid of these - so just use a pastry brush to get them to one side and flick out of the case (remember that the pastry is short, and therefore fragile - don't be too aggressive with it or the walls will collapse).
At this point you can pour your filling, which should still be relatively liquid, into the case. Spread evenly with the back of a spoon, then transfer to the fridge for 30 minutes.
Cut a slice, pour a coffee and get yourself ready for the sugar rush!
