Honeymoon part 2: Lyon
... and a Tarte aux Pralines


Lyon is a beautiful place - I actually enjoyed my visit there even more than Paris. I guess it was the relaxed atmosphere; it was supposed to be a holiday after all!
When we stepped off the train from a rainy (but warm) Paris, a wall of 33°C heat hit us. I was still wearing a leather jacket, and didn't take it off until we reached our apartment; I guess you can take the boy out of London ...
Our first outing was to a place that I'll remember for the rest of my life - to eat at, and meet with, the legendary Paul Bocuse. A lot of people complain that PB's flagship restaurant is stuck in the past - well yes, it's the epitome of classic French cuisine; but so what? That's exactly what we'd come for, and it was brilliant on every level. I can normally roll with the best of them in the gluttony stakes; but Paul Bocuse truly managed to finish me off. The words "here are the dessert trolleys - have whatever you want" should never be said to me.
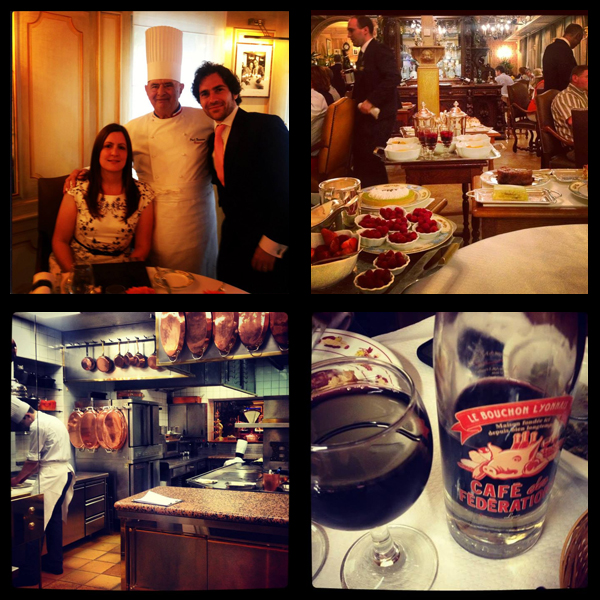
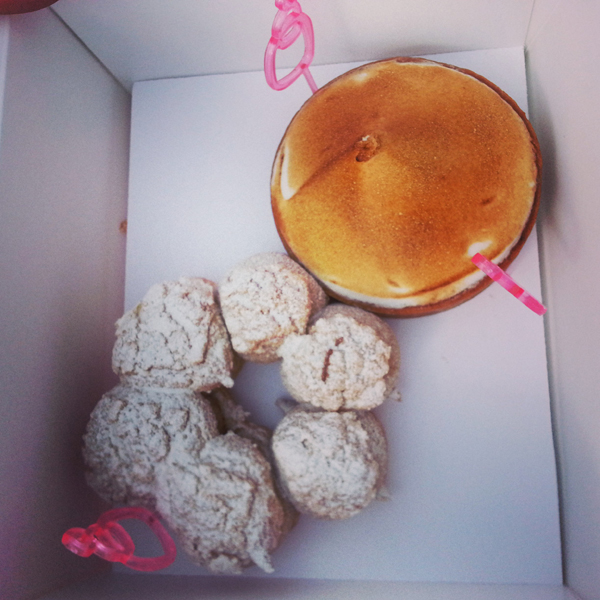
The next day, we visited Bernachon to try their signature President cake and Palet d’Or chocolates (likely the best chocolates I've ever eaten), then walked to Les Halles de Lyon Paul Bocuse for even further treats (and a spot with the famous Mrs. Sibilia).
That night, sadly our last in Lyon, we visited Le Café des Fédérations. On one hand it was the polar opposite of Bocuse; classic Bouchon food ... but in terms of enjoyment (and richness), it was almost as good.
While my sweet memories of Lyon will be the Palet d'Or and multiple Baba au Rhum, the recipe I've chosen for this part of the blog is probably the most classic Lyonnaise dessert of all; Tarte aux Pralines.
It's made of special red-sugar-coated almonds that you can pretty much only find in Lyon, melted and mixed with cream in a sweet pastry case. The recipe is simple so, if you can find them, grab a bag and give it a try.
Ingredients (makes 1 shallow 28cm tarte or a deeper 20cm one)
Sweet pastry case
- 250g Plain flour
- 75g Icing sugar
- 120g Unsalted butter
- 2 Large egg yolks
- 2 Tablespoons of cold water
- Pinch of salt
Filling
- 200g Lyon pink pralines
- 300g Double cream
Step 1: Make the case
Weigh out your butter and let it sit to come up to room temperature. Take the plain flour and gently mix with the icing sugar and salt on your work surface.
Make a well in the centre, and drop in the butter. Start to rub the butter into the flour/sugar mix with the tips of your fingers, gradually drawing in all the mix until you get a crumble-like texture.
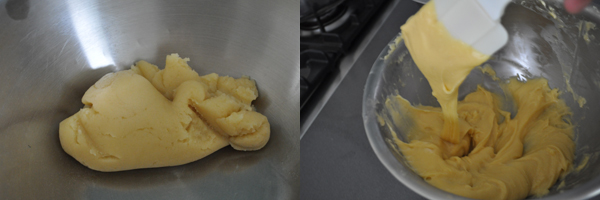
When the butter is evenly distributed, make a well in the centre again and this time add the egg yolks and water. Mix with your fingertips again, drawing the mix in, and lightly pressing the ingredients together.
Try not to knead or heavily mix the ingredients, as you'll end up with pastry that shrinks when cooked. The point you should reach is when the mix looks yellow, but may not "come together" like a normal dough (in other words, it will be quite short).
Form into a ball, wrap in cling film and put in the fridge for 30 minutes to firm up.
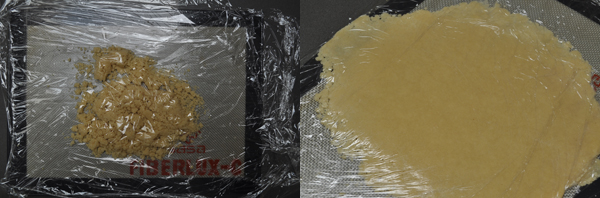
When ready to prepare the case, take a sheet of cling film and lay it on your work surface. Take the pastry out of the fridge, unwrap and place in the centre of the cling. Use a rolling pin and roll out to a circular shape by rolling and quarter-turning the cling as you go. If you have a normal cling film, it will be about 30cm in width, so your pastry should come a touch over the edge. What we want is enough pastry to go up the sides of the flan ring, then very slightly over the top.
Line a baking tray (at least 30cm x 30cm) with a sheet of greaseproof paper. Take a 28 cm flan ring (don't use a tin; a flan ring produces much better results, especially on the base) and place this on the paper.
The next part is a bit tricky. Sometimes, if the pastry is still cold enough, you can just invert it with your hands or rolling pin and drop this onto the flan ring. Otherwise, you can take the flan ring, place it on the pastry and then invert the whole lot at once, placing it over the greaseproof paper.
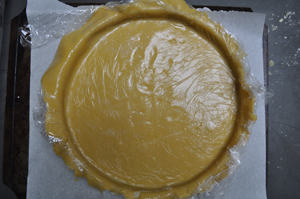
Either way, you should now hopefully be able to gently push the pastry into the base of the ring easily, as it's still coated in cling film. Push the pastry up the sides, and roll the little extra over the top so that it's outside the ring. Some people will trim the pastry with a rolling pin at this point; but I like to trim it after baking - just in case it has been slightly overworked and tries to shrink during cooking.
At this point, turn your oven to 170°C and put your baking stone in place (a pair of flat, stacked trays would also be fine if you don't have a stone). Remove the cling, prick the base of the case with a fork, and place this into the fridge for 30 minutes.
Step 2: Bake the case and make the filling
After 30 minutes have passed, take the case out of your fridge and carefully slide this onto your baking stone or trays in the oven (a baking peel makes this much easier). Remember to leave the greaseproof paper on the bottom!
This will take 25 minutes to bake; while you're waiting, make the filling.
Your pralines will come in a bag, and we need to crush them slightly - so batter them with your rolling pin. It's likely your bag will burst, so be careful.
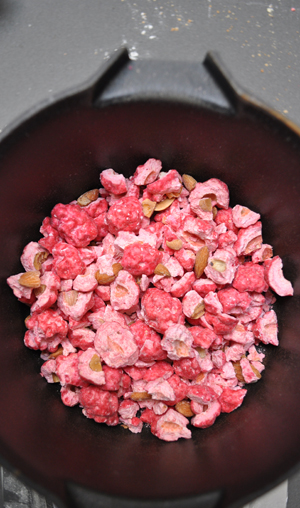
When every praline has been smashed at least once, transfer to a heavy-bottomed pan and pour in the 300ml of double cream. Place this on a medium heat and place your thermometer in there too.
Gently stir the mix from time to time. When the temperature reaches 100°C, stir more constantly to get the red colour to come out of the sugar and blend with the cream. When the temperature reaches 104°C, remove from the heat and poor into a clean bowl.
This won't set too quickly, so leave it there until needed.
When your pastry case is cooked, remove from the oven and transfer to a wire rack to cool for 10 minutes. After it has cooled, use a small sharp paring knife to carefully make a straight edge on the pastry case. At this point, you should be able to gently spin the flan ring and carefully lift it off. There will probably be some pastry trimmings inside the case, and you'll want to get rid of these - so just use a pastry brush to get them to one side and flick out of the case (remember that the pastry is short, and therefore fragile - don't be too aggressive with it or the walls will collapse).
At this point you can pour your filling, which should still be relatively liquid, into the case. Spread evenly with the back of a spoon, then transfer to the fridge for 30 minutes.
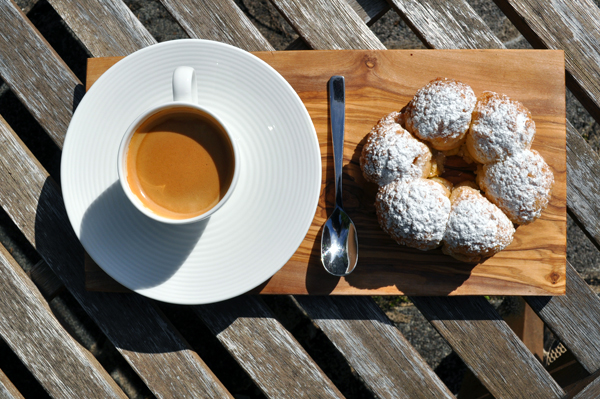
Cut a slice, pour a coffee and get yourself ready for the sugar rush!
Honeymoon part 1: Paris
... and the Paris Brest

Laura and I got married back in April, and as June rolled around it was finally time to take our honeymoon.
The journey started on the 14th, and took us from London to Paris, where we spent 3 days before moving to Lyon. After 2 nights in Lyon we flew to St. Emilion for the final part of our journey.
It was an unforgettable experience, and I thought I'd take a memory from each leg of the trip and try to re-create it at home.
While in Paris, we set out to visit as many pâtisseries as we could. One of the places I really wanted to see was La Pâtisserie des Rêves. It's an amazing place, and it was pretty hard not to try and buy everything in sight.

One of PdR's most popular pastries is their version of a Paris Brest. This light choux bun, filled with praline cream, is unbelievably good. The Paris Brest was invented in 1891 to commemorate a cycle race of the same name (which is why it's the shape of a wheel), and was said to find favour with the competitors due to its high calorie content. It stuck out from the rest as it's not something we often see in England.
We bought a lot of food that day, but chose to sit in the Tuileries Garden and share the Paris Brest in 30 degree heat with an espresso. True the hype, it was delicious - and inspired me to be the Parisian pastry I'd write about in the first of 3 France-related blogs.
The recipe below does take a bit of effort, but the end result is worth it for a pastry you're unlikely to find outside France.
Ingredients (makes 5 to 6 individual pastries depending on how large you pipe them)
Crumble
- 55g Strong white flour
- 55g Golden caster sugar
- 45g Unsalted butter
- Pinch of salt
Choux
- 80g Strong white flour
- 20g Plain flour
- 65ml Water
- 65ml Whole milk
- 55g Unsalted butter
- 5g Caster sugar
- Pinch of salt
- 3 Large eggs
Praline paste
- 80g Shelled hazelnuts
- 45g Blanched almonds
- 100g Caster sugar
Crème pâtissière
- 350ml whole milk
- 1 tsp vanilla paste
- 75g Caster sugar
- 15g Plain flour
- 15g Cornflour
- 3 Large egg yolks
Praline cream
- 100g Unsalted butter at room temperature
Step 1: Crumble
The first thing to make is the crumble topping, which is going to sit on top of our choux. It's a really important step that traps the steam inside the choux, allowing for a much better "puff". It also adds texture to the top of our end pastry.
To make, simply blend all the ingredients in a food processor until you see a fine crumb texture. You really should use a processor for this stage, as you want to ensure a totally even distribution of ingredients throughout the mix. Lay a sheet of cling film out on your work surface, then pour the crumble on top and lay another sheet of cling on top of that. Take a rolling pin and gently roll the mix until it's 1 to 2 mm thick. Take this flattened mix, place on a tray and put it in your freezer for at least 45 minutes.
Step 2: Choux
This next step takes about 20 minutes, so make sure your crumble is nearly frozen before starting.
Set your oven to 180 degrees C, and place a shallow baking tray in the bottom. Fill your kettle and boil, then sift the two flours together and set aside.
Put the water, milk, sugar, salt and butter in a saucepan and heat until it reaches boiling point. Quickly take it off the heat, drop in your sifted flour, and quickly mix together with a wooden spoon until combined. Put this back on the heat, and cook - always stirring with the spoon - for about another 60 seconds. Tip this out into a bowl and leave for about 5 minutes to cool slightly.
When you're ready, take your 3 large eggs and crack them into a bowl. Beat together with a fork. This next step can be done by hand with the spoon, or you can put your choux base into the bowl of a stand mixer with the beater attachment. Pour in 1/3 of the beaten egg, and mix with the choux base. It's going to look like the mix splits almost immediately, but keep on going and that egg will eventually force its way into the flour mix! Repeat twice more so that all three eggs are combined.
A note about egg sizing at this point - this recipe calls for "3 large eggs" and often you'll see "4 medium eggs" in choux recipes. It's hard to judge, but I often find that there's some egg left over with 4 medium eggs. In any case, the key here is that the end choux should be of a dropping consistency - that is to say the mix will slowly drop from a spoon when picked up. You need to do this by eye - but 3 UK Large-size eggs does the trick for me.
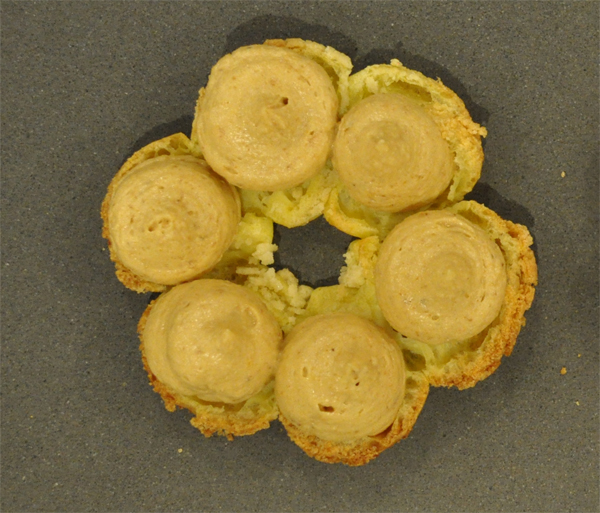
Now you've made the paste, put a 1 cm piping nozzle into a disposable bag, and fill it with the choux. Take your frozen crumble out of the freezer, and find a cutter that's about 2cm diameter (bottle tops from drinks are quite a good size if you don't have anything else to hand). Cut 6 circles of crumble per Paris Brest - remember to peel off any cling film you might have cut out.
Take a baking tray, and either cover it with greaseproof paper or use a silicone mat if you have one. Pipe your first choux - it should be about 2.5cm wide and about the same height at the peak. What we're going for here is a hexagonal type shape, so the easiest thing to do in order to guide you is pipe another identical round, in a straight line, about 3 cm across from the first. That's the guide done, so now pipe the two upper parts of the hexagon to connect them, then the two lower parts. Now that you've piped the shape, take your crumble cut-outs and place one on the top of each choux round. Press them down very gently so that they all sit at approximately the same height. Repeat this process with your remaining choux paste and crumble pieces.
When ready to bake, put about a wine glass full of boiling water in the tray at the bottom of your oven, put the tray of choux in as well, and bake for 10 minutes. At the 10 minute mark, open the door of the oven briefly; the steam should mostly be dispersed at this point, and your choux risen. Close the door and bake for a further 10 minutes.
After the full 20 minutes has passed, take out the tray - the choux should easily come away from the silicone mat / greaseproof paper. Leave on a wire rack to completely cool. Leave the oven switched on for the next stage.
Step 3: Praline paste
Here in the UK, it's quite hard / costly to find praline paste. In any case, it's quicker to make your own out of things you might even have in your cupboard already. Take the hazelnuts and almonds, spreading them out on a tray. Place in a preheated oven at 180, and roast off for about 5 minutes. The amount of time you leave the nuts in your oven depends on how deep you want the flavour to be - less long for a less nutty praline, longer for stronger ... though obviously if you leave them in too long they'll burn, so keep an eye on them.
Once you've roasted the nuts, remove from the oven and spread out onto a silicone mat (or, again, greaseproof paper). Place the matt or paper onto a cooling rack so that it's not directly on your work surface.
Add the sugar to a heavy bottomed pan, and heat. We want a pretty deep amber colour caramel - so at the point you see the caramel start to smoke, it should be there. Pour the caramel over the nuts and leave to completely set.
Once cool, use a rolling pin to gently break up the caramel into smaller chunks. Take the whole lot and carefully put it into your food processor. When you blend it initially, it will just look like dust - but carry on blitzing, and eventually the oils will be released from the nuts, and the consistency will turn to something resembling butter. This is your praline paste; you'll probably need about half for this recipe. It will keep in the fridge for a week or so.
Step 4: Crème pâtissière
Crack the egg yolks into a bowl, and add the sugar. Whisk until the yolks turn a pale colour, then sift in the flour and whisk again. Heat the milk and vanilla paste in a heavy bottomed saucepan until it boils. Remove from the heat, then pour a little of the hot milk on the yolk mixture to temper it, whisking constantly. Continue to add more of the milk mixture, whisking all the time. Eventually you should have mixed all of the hot milk with the yolk mixture - now transfer the whole lot back into the pan and place over a medium heat. Use a wooden spoon to continually stir, making sure you get right to the bottom of the pan. Your custard should thicken very quickly - but keep cooking until it's totally smooth and thick (it should take about 60 seconds). When ready, pour the custard into a clean bowl and put some cling film over the surface to stop a skin forming. I find cling is better than the icing sugar / cornflour dusting method, but normally pull one corner away from the custard to let heat escape.
Step 5: Praline cream and assembly
Place the 100g of butter in a stand mixer with the beater attachment fitted, and whip on a high speed until soft. Reduce the speed, and add half of your praline paste, making sure it blends completely (you'll want to scrape down the bowl). Keep the mixer running, and mix in the crème pâtissière. When the whole thing is amalgamated, taste the cream to see if it needs more praline paste or more sugar and adjust accordingly. Once happy, place a 1cm piping nozzle into a disposable piping bag and add the praline cream to it. Place this in the fridge to firm up. While you wait for this, go back to your cooled choux shells and carefully cut them in half horizontally. You may find that some of the individual shells come away from eachother during this process - but don't worry; they will all stick back together when you pipe the praline cream into the hollow shells. When the cream is firm, pipe enough into each of the 6 shells to fill it and come out half as high again.
Carefully place the shells back on top of the cream and push down slightly to settle. If you're not serving straight away, place them back in the fridge.
When ready to serve, dust with icing sugar and enjoy.