


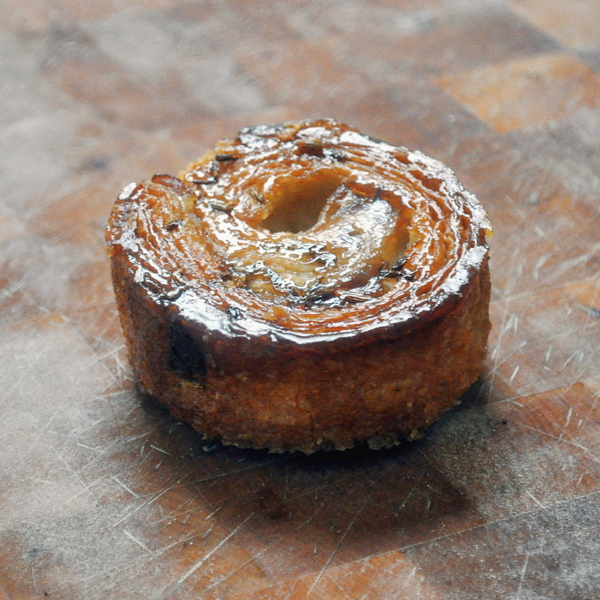
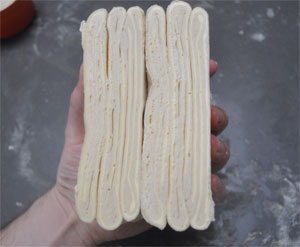
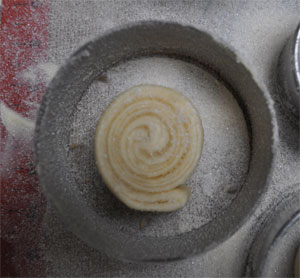
Apple, Fennel & Rose Kouign Amann
Classic French viennoiserie with a toffee apple twist

It was the hottest day of the year here in the UK yesterday - and I was out having meetings, fully suited up, sweating like a pig being eyed up by Mr. Koffman.
Strangely, we're supposed to be on our way to the Autumn equinox ... tell that to my apple trees, who's fruit should be ready for picking, but so many have spoiled in the heat.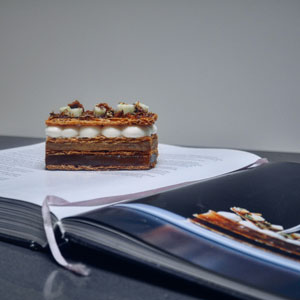
I made Heston Blumenthal's delicious "Taffety Tart" last weekend, and it gave me an idea - why not add the same apple, rose and fennel combination to something else.
Kouign Amann is a yeasted, butterry viennoiserie from Brittany made popular by GBBO a few years ago. The addition of thin apple slices and rose petals to the inside, with fennel seeds on the base gives the pastry an autumnal twist, caramelising the apples with a toffee-like flavour. I've used Bramley apples as I've got a ton of them - but also because they serve to cut through the sugar a little. I'm also resting the dough in the fridge overnight as is often the case with Croissants, which helps make them taste even better.
You're supposed to let them come to room temperature before eating - I challenge you that this is impossible after the smell fills your house.
Ingredients (makes 8 to 10 Kouign Amanns)
For the pastry
- 500g strong white flour
- 50g golden caster sugar
- 14g fast action yeast
- 200g room temperature water (~25°C)
- 50g room temperature milk (~25°C)
- 10g salt
- 100g unsalted butter - for the mix
- 250g unsalted butter - for the butter layer
For the apple puree
- 3 Bramley apples
- 50g golden caster sugar
- 100g water
For the roll in
- 100g golden caster sugar
- 3 Bramley apples
- 60g caster sugar
- 5g rose petals
For baking
- 100g golden caster sugar
- 25g unsalted butter
- 10g fennel seeds
Equipment required
- 10cm, 4cm tall tart rings
- Stand mixer
- Silicone mat
Make the dough
Mix the water, milk and sugar together then dissolve the yeast into this. Leave to stand for about 10 minutes until bubbly.Place your 500g of flour in the bowl of a stand mixer, and attach your dough hook. Pour in the yeast mix, and let it start running on a low speed until combined.
 Slowly add the chopped butter, piece by piece followed by the salt. Keep it kneading for 8 minutes.
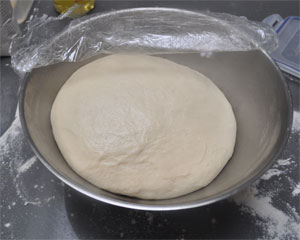
When it's ready, place into a clean, buttered bowl and cover with cling film. Let this stand until doubled in size - which will probably take 1 to 2 hours depending on your temperature or whether you put it into your proofing box.
Once it's ready, deflate the dough and flatten it into a rough rectangle. Cover it in cling film again, then place in the freezer for 30 minutes.
In the meantime, make your block of butter. Place a sheet of cling film on your work surface, then put your remaining 250g of butter (i.e. a pack!) in the middle. Cover with a second piece of cling film.
Begin to tap the butter with your rolling pin so that it softens. Eventually it will become pliable enough to roll into as perfect a square as you can. Use your hands on the upper piece of cling to straighten the edges if you need to. When you're happy with the block, place it into the freezer too.
Roll in the butter
 This next stage requires you to be reasonably precise with your rolling. What we're trying to do is keep the edges as straight as possible, and also to make the butter come up right to the edge - which means there won't be any part of our pastry without butter. These butterless points can create pockets which don't rise as well, so it's worth taking a time over this bit.
Roll out the now cold dough to as close as double the size of your butter block as you can get. If the edges aren't straight, try to re-form them with your hand or if you don't mind losing a bit of dough you can cut them off.
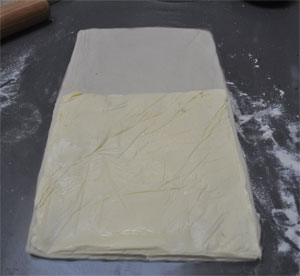
Remove the block of butter from the freezer, and take off the cling. Position it at the bottom half of your dough rectangle, then fold the top half over the top so that it's sandwiched in-between.
At this point, it should still be cold enough that the butter doesn't start squeezing out. Press down on the end of it do seal, then make a quarter turn with the dough (i.e. if the two ends of the pastry were facing you, turn it 90° so they move to being at a right angle to you).
Carefully roll the dough, in your body's direction, into a large rectangle about the length you made it when you were first inserting the butter block. Fold the dough, taking the furthest part away from you, and fold that 2/3 of the way back past the centre, then fold the remaining 1/3 back over the top of that (meaning you'll have 3 1/3 layers). This is turn one.
Wrap it back up in cling film, then return to the freezer for 30 minutes.
When time's up, repeat the fold process by placing the dough in front of you, with the seam you made in the last fold at a quarter turn away from you. Roll it out into a rectangle again, then perform the same 2/3 and 1/3 roll you made before. You've now made turn two.
Wrap it in cling - but this time place in the fridge and leave overnight to develop the flavours.
Make the apple puree
Peel and core the apples, then roughly chop. Place the water and sugar in a heavy based saucepan and add the apples.Let the apples simmer until they're really soft, then use a hand blender or food processor to blend them into a puree. Leave to cool then set aside.
Build the roll in
 Core and peel your remaining 3 apples. Cut in half, then Slice as thinly as you can (and I mean really thin!) - or use a mandolin if you have one.
 Take the dough out of the fridge and now we'll make one last turn. Repeat the fold process by placing the dough in front of you, with the seam you made in the last fold at a quarter turn away from you. Roll it out into a rectangle again, then perform the same 2/3 and 1/3 roll you made before.
At this point it's worth cutting the dough in half, as it's much easier to handle two rolls of Kouign Amann pastry - it also means you can keep half the mix for another time if you want to freeze it. Wrap the half you're not using and place back in the fridge.
Take the other half and place on the work surface with the seam at 90° to you. Scatter 1/4 of the roll in sugar on top of this.
 Roll the dough into a rectangle one final time, which will push the sugar into the dough.
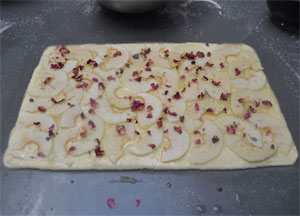
Place a sheet of cling on your work surface, and flip the dough onto it so that the sugar is now underneath. Brush over a thin layer of your apple puree, then scatter another 1/4 of the sugar all over this. Place slices of apple over the top, and finally scatter over the rose petals.
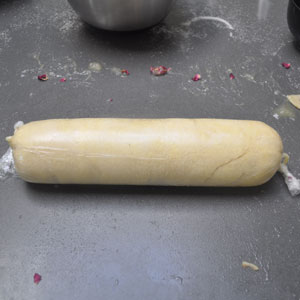
Now, from the longest side, start to roll the pastry, keeping it as tight as you can. When you've rolled it up entirely, bring the cling film up and over, then twist and hold the ends. Keep rolling it towards you in short strokes so that the pastry gets tighter in the middle.
Place in the freezer for 30 minutes. If you're making the other half of the dough now, repeat the process with the other half of the sugar, apples and rose petals.
Slice and proof
 Toast your fennel seeds in a pan until they start to smoke, then remove from the heat and reserve.
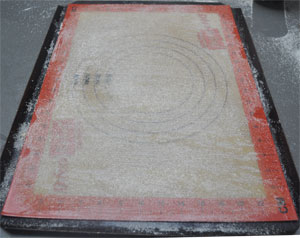
Heat 25g of butter, then place a silicon mat onto a heavy baking tray. Brush the butter over the entire tray, then scatter over your sugar. Shake so that it covers the entire mat. Pour any excess sugar back into a bowl.
 Take each pastry ring and brush it with butter too, then dip and roll each one in the bowl of sugar so that the insides are coated entirely. Place them on the mat, spread evenly, then scatter some fennel seeds inside each one and finally scatter over some more sugar (Note: Jamie Oliver would not approve).
Remove a roll of pastry from the freezer and cut off the end. Now make slices around 2 1/2 to 3cm tall, trying to keep them as round as possible. Place each slice into one of the pastry rings.
Now leave to proof - it will take about 2 hours. Some time before they're done, pre-heat your oven to 180°C.
Bake
This is the fun bit that will have people running for your kitchen.When the pastries wobble a bit if you shake the try, they're ready. Place into your pre-heated oven and bake for 35 minutes.
After time's up, let them cool a little so that the caramelised sugar hardens.
Carefully pull each one up, breaking them out of the sugar. Trim the sides with a knife then gently push them down from the top so they fall out of the rings.
Leave to cool to room temp so they go really crispy. If you can stand to.
Apple Butter & Toffee Apple Macaron
The apple overload begins

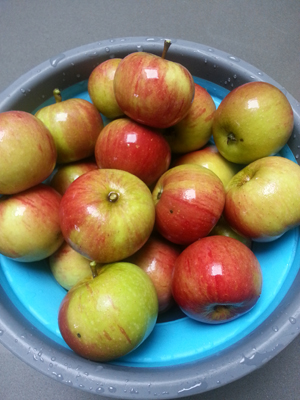
Our fig and plum trees have had a bad year this year, but the alternating wet / hot weather has really suited apples and blackberries in the garden. Our Granny Smith tree is yet to be picked, but I've brought in the first crop of a strange Pippin hybrid. We don't actually know what variety of apple it is - not super sweet, but not sour like a Cider apple. In any case, we have loads - far too many to eat out of hand.

One of the best things to do with too many apples (my parents' are currently picking about 100 a day in their garden) is to make Apple Butter. This is a slight misnomer, as it doesn't contain any butter or dairy ingredients - it's named after its smooth texture.
Apple Butter's origin lies in the Netherlands, and transferred to America where it's still popular - but is rarely found here in the UK. It's a great way to get 3 to 4 weeks life out of apples that would otherwise be wasted.
Uses are far reaching - have it on toast, with or without cheese. As part of your cheese course instead of quince paste. Add it to cocktails or ice cream ... or use it as an ingredient to make something else; in this case, Toffee Apple Macarons.
The recipes for both are below - you can make the apple butter with (as is traditional) or without spices; here I've opted for without so that it's more flexible as a cooking ingredient.
Apple Butter
Ingredients
- 1kg apples
- 100ml water
- 140g to 160g caster sugar
- 1 tbsp lemon juice
If adding a spice mix
- 1 star anise
- 2 tsp ground cassia bark or cinnamon
- 1/2 tsp ground cloves
- 1/2 tsp ground ginger
Equipment required
- Slow cooker
- Sieve
- Hand blender or food processor
- 700ml sterilised jar (Kilner style if possible - to sterilise your jar, upturn it in an empty dishwasher and perform a hot cycle without soap or tablet)
Wash the apples, then core but leave the skin on. Quarter them, and place in the bowl of your slow cooker with about 100ml of water. My slow cooker only has one setting (its primary use is for cooking rice) so just set it as high as it goes and close the lid. Cook the apples for 4 hours in total, stirring every 30 minutes to make sure nothing's catching and to help them break down.
By the end of the cooking time, the apples and their peel should be pretty much disintegrated into pulp. Transfer to a bowl, and use a hand blender to purée the apples as finely as you can. This may take 5 to 10 minutes. When happy, place your empty slow cooker bowl onto a weighing scale and zero it. Put a relatively fine sieve on top and pass your purée through the sieve into the slow cooker bowl (a bendable silicone bread scraper is useful here).
Weigh the purée - it should register somewhere between 700g and 800g. Now add the sugar - this is down to your taste preference, and also depends on how sweet your apples were to begin with. If they are a sweet variety, or you want a more tart butter, add 10g per 100g. Due to the slight sourness of our apples, I've gone for 20g for every 100g - so if you have 700g of puree, add 140g of sugar. It's personal preference; but the 20:100 ratio will give your butter a longer shelf life. Add the lemon juice (which also helps preserve the finished product) and, if using, stir in the spices.
Put the slow cooker bowl back in the slow cooker, set as high as it goes again, close the lid and leave for a further hour - this time stirring every 15 minutes to prevent catching.
After the hour is over, transfer to a bowl to cool. If you've used star anise, don't forget to remove it now. Pour into your sterilised jar - from the 1kg of apples you're likely to fill a jar with a capacity of 700ml.
Store in the fridge - it should last 3 to 4 weeks.
Toffee Apple Macarons
Ingredients (makes 12)
For the macaron shells
- 150g Ground almonds
- 150g Icing sugar
- 110g Egg whites
- 150g Caster sugar
- 37ml Water
- 3g Green powdered food colouring (Americolor)
For the filling
- 100g Caster sugar
- 125g Unsalted butter
- 3 tbsp Apple butter
- Pinch of salt
Equipment required
- Food processor
- Stand mixer
- Thermometer
- 2 baking mats
- 2 heavy trays
- 2 disposable piping bags and 1cm nozzles
I use the Italian meringue technique by Pierre Hermé to make the shells - but everyone has their own tweaks to get consistent results at home.
Start by preparing everything - have your baking mats on some heavy trays, get out the piping bag and place the nozzle inside. Measure out the 150g of caster sugar and 37ml of water into a small pot and place on your stove top with a thermometer inside. Measure out 55g of your egg whites into the bowl of a stand mixer, and connect the whisk attachment
Now put the 150g of icing sugar in the bowl of a food processor, followed by the 150g of ground almonds (putting the sugar in first helps to stop it leaving the processor in a cloud of dust). Blend for a few minutes to make sure everything is as fine as possible. At this point, tip the mix into a new bowl (one big enough to fix this mix and the meringue later) and re-weigh to make sure you have exactly 300g of dry ingredients. Top up if necessary. Take the remaining 55g of egg white and place in a small bowl, then add the green food colouring and mix. If you can't find the powder colour, paste is the next best thing. Avoid liquid food colouring if you can, as they tend to dilute the mix too much. Pour this mix on top of your dry ingredients and set aside.
Start to heat your sugar / water mix in the pot over a high heat. Keep going until you hit around 112 deg C. Turn on your stand mixer to a medium high speed to get the whites whipping - remember not to go too mad with the speed at this point; you don't want stiff peaks nor soft ... somewhere in between is perfect. As the temperature of the sugar / water mix hits 118 deg C exactly, quickly remove from the heat, push up the mixer to high and slowly trickle the hot syrup onto the whipping egg whites in one smooth motion. Now leave the whites whipping until much cooler. If you raise the whisk and the meringue drips off quickly, don't despair - you've probably not left it mixing long enough, so just keep going until it comes away on the whisk and pretty much stays there.
Take a spatula and transfer all of the Italian meringue you've just made into the bowl with the dry ingredients you prepared earlier. Fold with the spatula until you get the desired consistency - to me, this is the crucial point where things can go wrong, and it's really hard to actually explain or even take a photo of the correct consistency. All I can say is that if you drop the mix from a spatula, and it doesn't re-absorb into the mix without trace in about 15-20 seconds, it needs more mixing. If it's more liquid than that, and just flies off the spatula, it's game over for you. Pierre describes it as "slightly runny cake dough". Make sure you get right to the bottom of the bowl though, or you may leave unmixed colour or ground almond at the bottom.
When ready, hold the piping bag and fold the top of it over your hand. Use the spatula to transfer the mix inside, then twist the top (put a kitchen clip on it if you like - I've lost mix many times by wandering aimlessly around the kitchen, not realising batter is dripping out behind me) cut off the end and get ready to pipe. I always have a bit if kitchen roll ready to clean the nozzle if too much mix clogs around it. This helps you pipe more perfect circles.
On the baking mats (and I would advise the Silpat-style ones over silicone, and both of those over just using greaseproof/baking paper - much easier to get them off later) pipe a row of 3.5cm rounds, keeping your nozzle as straight as possible. Keep about an inch between each round; you don't want to overcrowd the shells. Move to the next row, and pipe under the spaces you've left between the rounds on row 1. Carry on until you've filled the mat, then rap the baking tray on your work surface with relative force a couple of times. This helps to settle the batter, and is important not to forget. The French pros always do a little "whip" at the end of each pipe to stop the nipple effect (when a bit of the batter sticks up in the air), but in general I find these subside when you rap the trays. If not, you can use a wet finger to gently smoothen out any stray batter.
Repeat with the other mat so you have two full sheets. Turn your oven on to 140 deg c, set the sheets aside in the kitchen for 30 minutes to form a skin while you make the filling.
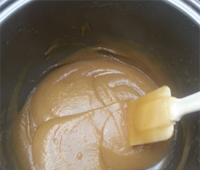
Weigh 25g of your unsalted butter onto a plate, put 3 tbsp of Apple Butter on a separate plate, and put both next to your stove top. Place the 100g of sugar into a heavy-bottomed pot. Never use a non-stick or black-coloured pot to make caramel! Use a medium heat to melt the sugar, and keep going until it becomes an amber colour with a hint of smoke emanating from the pot. As soon as it hits this point, immediately slide in the butter and use a spatula to constantly stir the caramel - it will bubble up, so be careful; sugar will burn you badly at this temperature. When the butter has been incorporated, drop in the Apple Butter and mix again. Pour the mix into a separate bowl and allow to cool.
Take the remaining 100g of butter, and put the beater attachment on your stand mixer. Beat the butter until it's completely smooth, which can take only 30 seconds on a high speed. Make sure you don't over-churn the butter though. When the caramel mix is cool, put the mixer on a medium low speed, and start to mix it into the butter a tablespoon at a time. You may not need all of the mix, or you may need the lot - as it blends in the mixer, look for a "whipped" consistency and taste it as you go to make sure you're happy with the flavour. When ready, transfer to another piping bag, twist or clip and place in the fridge to slightly firm up.
By now your oven should be hot, and the 30 minutes up. To test the shells, gently touch your finger on one; you should find that the skin has formed and won't leave batter on your finger. Place the trays in the oven, and set two timers going - one for 15 minutes, the other for 5. When 5 minutes are up, quickly open and close the oven door to release any steam build up. You'll be able to have a sneaky look at your macs at this point - you'll probably see the foot has already started to form. Don't leave it open long though, and re-set the timer for another 5 minutes. Repeat at the 10 minute mark then, after 15 minutes are over, test one of the macaron by seeing if it will come away from the baking mat. It won't just fall off, you need to slightly twist it. If there's any bend do it, leave it; they aren't ready. Carry on cooking for another 2 minutes and try again. You don't want to overcook your macaron, or you'll get a burnt colour and solid insides - so just repeat in 2 minute intervals until you can pull off one of the shells. When happy, remove from the oven. If you've got it slightly wrong, the shells will start to darken after about a minute out of the oven; this is caused by an undercooked inside - all is not lost; turn off the oven, and place the trays back inside with the door slightly open. This will gently cook the insides. Check them every minute - if all looks well, remove from the oven and allow to cool slightly on the mats.
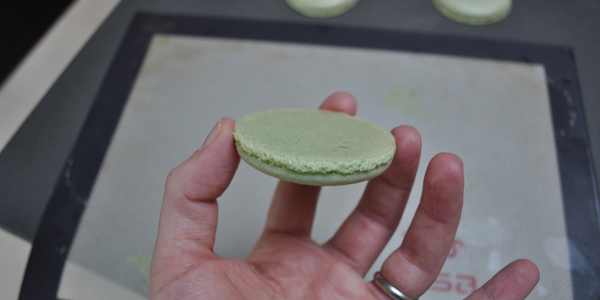
What you're going for is a nice smooth base, raised foot and a soft slightly chewy inside. Obviously you can't check that last bit without eating one - though if you've piped an odd number of shells, you can always bite into one to test.
Peel each shell off and place on a cooling tray; if any get stuck, use a small spatula to slowly work around the foot, then under the shell to release it. If you're really good at piping, then all of the shells will be the same size. I never get it perfectly, so at this point will match up pairs of shells that are actually the exact same size. We're now ready to pipe - so take the filling out of the fridge and cut off the top of the bag. If the mix is too solid, leave until it's pipe-able. Squeeze a generous amount into the upturned centre of one of the shells, then place the other half your the pair on top, and press down gently until the filling starts to reach the sides. Repeat with all remaining shells and filling.
Now the really hard part - not eating them. Put the finished macaron into a box with a lid, and place into your fridge. After a few hours, they'll taste much better than when you first made them. Leave for at least 24 hours, and you'll get the best flavour and texture.
