


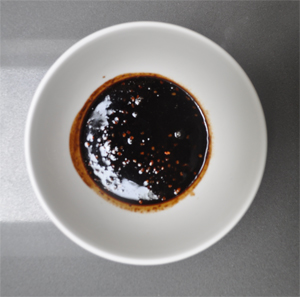
Meshgengouz-ish
A kind of Armenian Nutmeg cake

Armenia is famous for a few things - invention of the spinning concrete truck, Cher, Andre Agassi, Gary Kasparov, and that lady with the massive arse (all of us Armenians have one).
Desserts, however, are not something our cuisine is famous for. One of the most well known is the Armenian Nutmeg Cake - Meshgengouz Gargantag. It's a cake rich in nutmeg, sugar and walnuts that's great with a coffee.
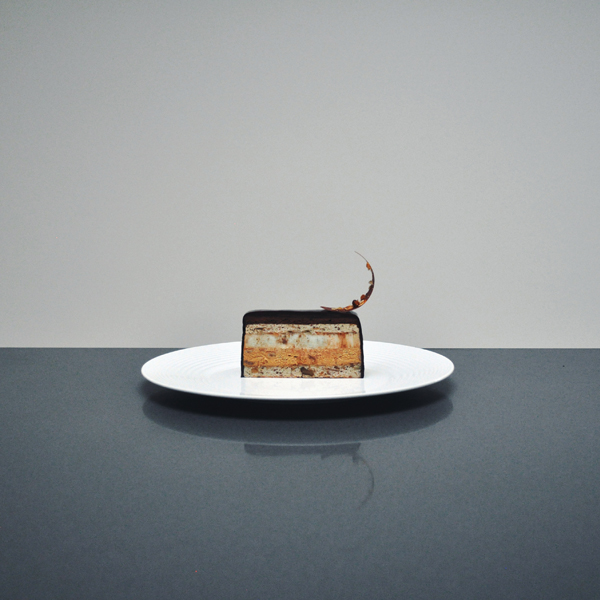
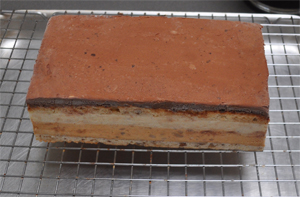
I wanted to make something along these lines - so here it is; layers of walnut dacquoise, salted caramel walnut mousse, a set nutmeg custard and a dark espresso ganache.
Makes 1 cake
Ingredients
For the two layers of walnut dacquoise
- 70g walnuts, roughly chopped
- 130g ground almonds
- 60g flaked almonds
- 120g icing sugar
- 25g cornflour
- 40g caster sugar
- 140g egg whites
For the salted caramel & walnut mousse
- 30g walnuts, roughly chopped
- 85g caster sugar
- 30g water
- 2.5 sheets of gelatine
- 360g whipping cream
- 1/4 teaspoon of sea salt
For the set nutmeg custard
- 1 whole nutmeg
- 240g whole milk
- 40g caster sugar
- 20g cornflour
- 2 large egg yolks
- 2.5 sheets of gelatine
- 100g whipping cream
For the espresso ganache
- 100g dark chocolate, at least 70% cocoa solids
- 90g whipping cream
- 10g freshly brewed espresso
- 15g butter
For the chocolate glacage (recipe from William Curley's book)
- 18g of sheet gelatine
- 235ml water
- 300g caster sugar
- 100g cocoa powder
- 170g whipping cream
For the chocolate tuiles
- 150g bittersweet chocolate, at least 70% cocoa solids
- Any remaining nuts from the processes above
Assembly
- Coffee liquor (e.g. Illy)
Equipment
- Stand mixer
- Thermometer
- Some form of tall mould - a straight sided loaf tin would work, or cake frames if you're being flash
- Silicone mat
- Acetate cut into small triangles about 4 cm long and 2cm wide
- A U-shaped metal bouche mould (for the decorations)
This recipe takes a bit of patience. Okay, a lot - so start making it at least a day before. You'll be freezing the cake several times, so you can work on and off over several days.
Make the dacquoise
Heat your oven to 230 degrees C (fan), and take out two baking trays. Spread the whole nuts on one, then spread out the ground almonds on the other. Bake for 5 minutes until they get a bit of colour. Turn the oven down to 180 degrees C. Remove the whole nuts and crush them with a rolling pin, or a very brief whizz in a food processor - you want them to remain partially whole.
Take another tray, and lay a silicone mat on top - one that is about twice the size of your end cake. Pour the crushed nuts onto here and spread them out evenly.
Put the ground nuts in a bowl, then gently combine with the icing sugar and corn flour.
Place your egg whites in a stand mixer, and whip on high speed to a soft peak. Keep it running, and gradually pour in the caster sugar until you get a stiff meringue. Fold this meringue into the dry ground nuts until it has completely combined, then spread this out over the top of the roasted nuts in the tray. You want to end up with a thickness of around 1/2 a centimetre. Use a flat spatula to make the top as smooth as you can.
Bake for around 20 minutes, then remove and leave to cool.
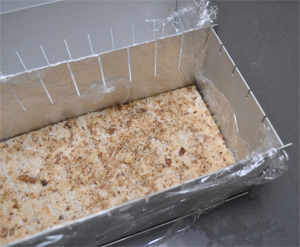
Assembly step 1: Line your cake tin with a double or triple layer of cling film - this will stop leaks later on. Measure your tin or cake frame with a ruler or measuring tape. Cut two pieces of cooled dacquoise the same size as this, then put one in the bottom of the frame, and the other in an air-tight container for later.
Make the salted caramel & walnut mousse
 Take the gelatine sheets and place in a bowl of cold water to soften. Weigh out the whipping cream and salt.
Put the caster sugar and water in a heavy bottomed saucepan - preferably a stainless steel one so you can see the sugar changing colour. Heat this until it boils, then watch it turn to an amber colour - don't let it go too far. When it reaches the smoke point, carefully throw in the salt, and slowly pour in the cream with one hand while mixing with a wooden spoon. It will bubble considerably, so just do it bit by bit.
Once these have all been mixed, take off the heat and pour into a tray or bowl. Let it cool slightly, then mix in the gelatine. It should dissolve after a few stirs, but if not use a hand blender to make the magic happen. Pour through a sieve into another container, then put in the fridge for about an hour (or freezer for 15 minutes)
When the caramel is cold, Whip the cream to soft peaks - just enough to hold its shape; don't bring it to that "churned" consistency. Take the caramel, and place it in your stand mixer (fitted with the whisk attachment). Whip it up until it's the consistency of butter.
Fold the cream into the caramel, then fold the walnuts in.
Assembly step 2: Take a some of your coffee liquor and pour into a small bowl. Dip a pastry brush into this, then lightly brush the dacquoise. Pour the caramel over the dacquoise layer, and make smooth with a flat spatula. Place the tin or frame in the freezer to make it completely hard.
Make the nutmeg custard
 This is a more liquid layer, so make sure your mousse has completely frozen before making it.
Take the gelatine sheets and place in a bowl of cold water to soften. Place the milk and caster sugar in a saucepan, then put the egg yolks and cornflour in a metal bowl. Whisk the yolks until they start to turn yellow and the cornflour has completely combined.
Heat the milk and sugar until they just hit the boil, then pour a little over the eggs to temper them, mixing with a wooden spoon or whisk as you go. Pour more and more of the hot milk into the bowl until everything has combined. Pour this back into the saucepan and immediately begin to stir or whisk - the cornflour will start to work within about 20 seconds.
Once the custard has thickened, take off the heat and pass it through a sieve into another bowl. Grate one whole nutmeg (I know, but trust me!) into the custard, then stir to combine.
Take the gelatine out of the water and add to the custard while it's still warm. Once combined, leave the custard to cool to nearly room temperature (5 - 10 minutes) then again whisk the cream to soft peaks. Fold the cooled custard into the cream.
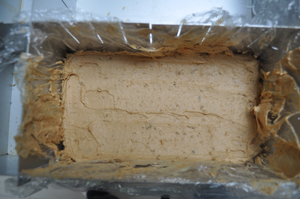
Assembly step 3: Pour the custard over the mousse layer, and tap to distribute evenly. Place the tin or frame back in the freezer to make it completely hard.
Make the espresso ganache
Again, wait until the custard layer is completely hard before starting this step
Place the chocolate and butter in a heat-proof bowl, and the cream in a saucepan. Heat the cream until it just hits the boil, then pour over the chocolate & butter and leave to settle for 30 seconds. Use a wooden spoon to stir the mixture together or, my preferred method, use a hand blender to do it so you can make sure everything is well combined.
Let the ganache cool slightly so that it's less liquid, but still pliable
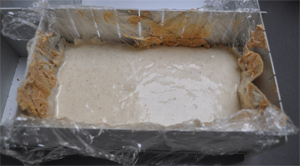
Assembly step 4: Take your reserved dacquoise layer and place this on top of the frozen custard. Again brush with some of your coffee liquor. Pour or spoon over the ganache and smoothen with a flat spatula. This is your final layer, so try to make it as smooth as you can. Place the tin or frame back in the freezer to make it completely hard.
Make the glacageNote: This is William Curley's recipe from his Couture Chocolate book. It's probably my favourite patisserie-related book, and has taught me a hell of a lot - so please go and buy it if you've not got a copy yet!
Put the gelatine sheets in a bowl of cold water. It's a lot of gelatine, but you need it.
Place the water and caster sugar in a saucepan, and heat until it boils - keep it rolling for 3 minutes.
Next, pour in both the cocoa powder and cream, then continue to boil for another 5 mintues. Don't keep the heat up to the max or it will bubble over the pan - keep an eye on it and reduce the heat if it gets too active.
 When time's up, take it off the heat. If the cocoa looks a bit claggy, use the hand blender again to make it smooth. Squeeze the water off the gelatine, then add it to the chocolate cream and stir.
Pour through a sieve into a jug, and place a thermometer in it. Let it cool to about 25 degrees C or as close as you can get - this can take up to an hour. If it sets completely, you can melt it again over a very gentle heat - but if you watch it and your cake is frozen you should be able to use it as soon as it's down to that temperature.
 Assembly step 5: Take the cake out of the freezer and unmould it from the tin or frame.
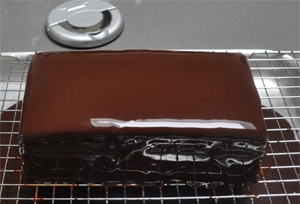
Pull off the cling film and then trim the edges so that you get as close to a clean rectangle as possible. Put the cake on a cooling rack that you've set over a clean tray. Pour the cooled glacage over the frozen cake - do it relatively slowly, but not too slowly as it will start to set over the frozen cake. Keep pouring all over, ensuring you have covered every part. I use a ladle to help with that - just scoop some up from the jug and pour over the naked bits. Place the whole thing, tray and all, in the fridge (note: not freezer) for one hour to set.
Make the chocolate tuilesPlace a metal bowl over a simmering pan of water. Put 100g of the chocolate into the bowl, and keep stirring with your thermometer.
When it reaches 47 degrees C, add the remaining 50g and remove from the heat.
Stir vigorously until it's all combined. Stop when you reach 31 to 32 degrees C. Take out the trusty hand blender if it has trouble melting.
If you need to raise it back to 31 degrees C, put it back on the bain marie briefly.
Place your acetate triangles on a silicone mat, then spoon over a small amount of the tempered chocolate. Smoothen with a spatula until it's covered and you can't see through onto the mat any longer
When you're done, clean the spatula then carefully remove each triangle onto a second clean mat and sprinkle with any of the nuts you have left
Leave this to set slightly - it needs to still be pliable, but not liquid. Carefully lift them again, and this time place into the bottom of a U-shaped bouche mould so that they curl up at the bottom. Let them dry completely before peeling off the acetate.
Assembly step 6: When the glacage has set, slice the cake with a hot knife. It's quite soft, even straight out of the fridge - so a blast in the freezer will help you not squash it as you cut. A piece 1.5 to 2cm thick would be a good portion. Top with a chocolate tuile and serve immediately.
Arabic Coffee & Cardamom Brioche
Simple recipe for a great breakfast loaf
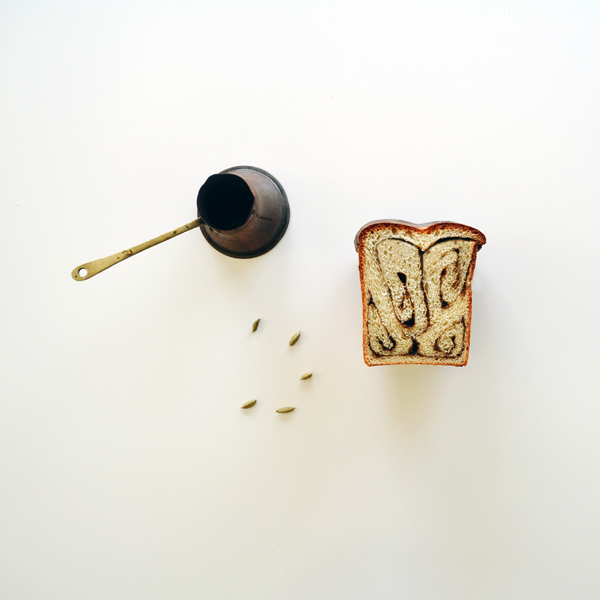
I'll always prefer espresso to any other type or method of coffee preparation, but Arabic coffee always brings back childhood memories of Sunday mornings.
All the Middle Eastern countries have their own claim to the way this type of coffee is prepared - in my house it was always the Armenian way; coffee, water, cardamom and sugar in the pot stirred then heated and risen twice.
This recipe combines the sweet coffee flavour with a rich brioche - best served lightly toasted to bring out the smell at breakfast time.
Makes 1 loaf
Ingredients
For the dough
- 400g strong white flour
- 7g dried yeast
- 10g salt
- 90g whole milk
- 100g unsalted butter
- 3 large eggs
- 30g caster sugar
For the filling
- 6 heaped teaspoons of finely ground Arabic-style coffee
- 30g caster sugar
- 10 cardamom pods
- 25g unsalted butter
For the glaze
- 1 large egg yolk
- 10g whole milk
Equipment
- Arabic coffee pot
- Muslin cloth
- Large loaf tin (3lb)
Start both the dough and filling the day before you want to make the bread.
Make the dough
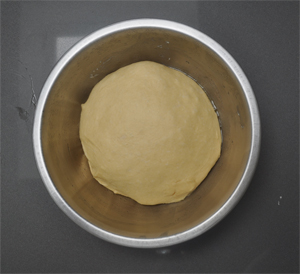 While I generally like to do things the traditional hand-made way, brioche is not the world's most fun thing to work with - so, place your dough hook on your stand mixer, and combine everything except the butter. Heat the butter very gently in a pot so that it melts almost completely, then let it cool slightly. Combine this with the rest of the ingredients, and turn your stand mixer to its lowest speed setting. Leave to knead for 10 minutes, then remove to a bowl, cover with cling film and put in your fridge for at least 7 or up to 24 hours.
Make the filling
You'll need to prepare 3 servings of coffee. Gently crush your cardamom pods to release the seeds within, then discard the dry outer shell.
Place a bowl large enough to hold 3 coffees next to your stovetop. Place two heaped teaspoons of coffee into your pot, followed by 10g of sugar. Fill the pot approximately 1/3 up with water and place on a medium-high heat. Don't take your eye off it or you'll get a volcano of coffee all over your kitchen.
As the coffee rises up the pot, pour half into the bowl then return to the heat for a moment. This will then bubble up again; so then pour the rest into the bowl.
Repeat this process twice more with the rest of the coffee and sugar. When you're done, take a sieve and place it over a jug. Put your muslin cloth over that, and carefully pour the coffee through in order to take out the grounds. Don't squeeze too hard as Arabic coffee is very finely ground, and some might make it through.
Next, place the cardamom seeds into the filtered coffee and whisk in the butter while it's still reasonably hot. Leave it out to cool and infuse, then cover in cling film and place in the fridge.
The rise
 After your dough and filling are suitably cooled, take them out of the fridge and lightly dust a work surface with flour. Roll out the dough into a reasonably square shape approximately twice the length of your loaf tin, making sure you add a bit more flour underneath if it starts to stick.
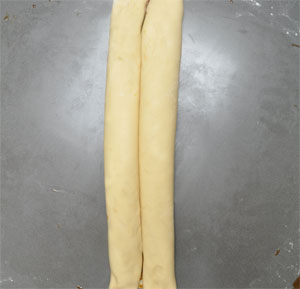
Spoon over the cooled filling, then use a flat spatula to try and spread it over the dough evenly. Next, start to roll one side in on itself, and keep rolling until you reach half way across your dough. Repeat with the other side so you end up with the two rolls meeting in the middle.
Butter your loaf tin, then gently cut the whole double-roll in half length ways so that you end up with two pairs of rolls. Place one set with the seam upwards in the bottom of the loaf tin, then invert the other so the smoother side is on top.
Leave this to rise for 3 or 4 hours, pre-heating your oven to 200 degrees C after about an hour.
After it has proved, make your egg wash by whisking the yolk and milk, then paint the top of your loaf and place it in the oven for 10 minutes. After 10 minutes are up, reduce the temperature to 180 degrees C and bake for a further 30 minutes. If your top looks too brown, cover in silver foil to stop it burning.
Once done, remove from the tin and let it cool for at least 15 minutes. Cut it, toast it, butter it and generally be happy.
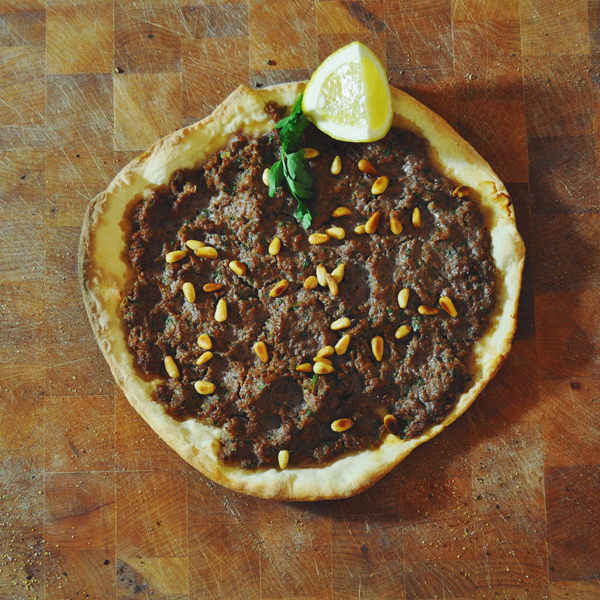
Lahmajun with an apple salad
An Armenian favourite, turned into a healthier protein-rich dinner
While not quite as exciting to post about, running or exercising well requires a certain diet. I've been pounding the streets of Mill Hill for over 20 years now, since the day I accidentally "auditioned" for the cross country team at school back in the 90s. For the last 10 years, the wife (who is also a runner) and I have stuck to a pretty simple set of rules - no alcohol during the week and eat healthy, lower calorie (but not low calorie) balanced food for exercise fuel Monday to Thursday ... then the weekend is ours to bathe in butter, bread and wine.
It's not about a super low cal diet for us. This suits a lot of people, but when you're out running for miles or working at high intensity in the gym it's simply not good for you to have zero fuel in the tank. You need some extra carbohydrates to power you if you're working hard, and protein to assist muscle gain and recovery.
This recipe is for a traditional Armenian dish, tweaked to be more healthy. My dad (one of those old school pure-blood Armenian types), says in his experience Lahmajun is made with lamb and fried onions. That sounds like a recipe for keeping our Kim Kardashian sized backsides up to standard Armenian XL size.
So, instead, I use beef fillet to keep things lean and bake the onions with the mince to cut another portion of oil out. Served with the apple salad, it makes a great dinner for days when you're exercising hard during the week.
Makes 4 Lahmajun / serves 4
470cal per portion
Ingredients
For the dough
- 120g warm water
- 3g active yeast
- 1 tsp olive oil
- 3g caster sugar
- 200g double zero (00) flour
- 2g diax
- 3g salt
For the topping
- 400g fillet steak, or another steak cut with all fat removed. Should be placed in the freezer for an hour to firm up
- 1 brown onion
- 20g fresh parsley (and some extra for garnish)
- 5g fresh mint
- 250g chopped, tinned tomato
- 1tbsp tomato puree
- 3g salt
- 1tsp pomegranate molasses
- 1 lemon
- 1g cinnamon
- 1g ground coriander
- 1g cumin seeds
- 2g all spice
- 20g pine nuts and an extra tsp cumin seeds for toasting
For the apple salad
- 1 eating apple (Braeburn)
- 20g fresh parsley
- 2tsp olive oil
- 1tsp pomegranate molasses
Equipment required
- Food processor
- Pizza stone or heavy tray
For the dough
Mix the water, olive oil, sugar and yeast in a jug and let it activate for 5 minutes. Mix the flour, diax and salt together then combine with the wet ingredients and knead (by hand or in a machine with dough hook) for 10 minutes.
Place the dough in a lightly floured bowl and cover with cling film. Keep in a warm place until doubled in size.
For the topping
 Freezing the meat makes it much easier to mince. Fillet can be soft to mince, so the low temperature allow it to pass through the blades without turning to mush. You can also used shop bought lean beef mince if you don't want to make your own.
Mince it, then grind a decent lot of pepper on top and set aside.
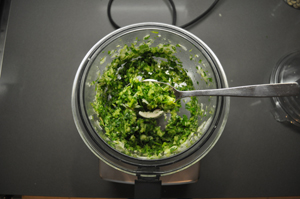
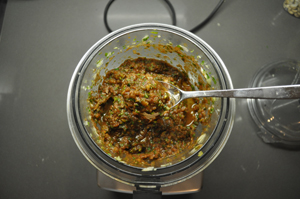
Take put your food processor. Slice an onion and remove the skin, then add that, the parsley and mint to the mixer bowl. Blend until roughly chopped - don't go too far, you don't want a puree. The photo here should give an indication.
Now weigh the spices and salt, then add to the onion mix with the tomato puree, canned tomato and pomegranate molasses. Blend again, being careful not to over puree it. Taste the mixture then add a squeeze of lemon juice to taste and more salt if required.
Leave this mix in the bowl of the processor for about 10 minutes - we want any of the excess liquid from both the onions and the tomato to come out. When you can see that has happened, use a spoon to hold the mixture back and carefully pour off the water into your sink.
Putting it together
Turn your oven on to 230c to pre heat, and put a big non stick pan over your hottest stove top burner or element. If you have 2 pizza stones, put them in the oven.
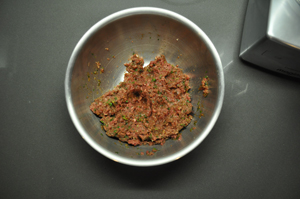
We left the food processor mix and beef separate so that the meat doesn't start to cook from the salt and lemon. When your oven is up to temperature and you're nearly ready to cook, combine the food processor mix with the mince. Don't overwork this - it should be quite loose. The photo here it what you should end up with.
Knock the dough back and split into 4 balls.
Flour the work surface and rolling pin, then roll out one ball to a round disc about 3mm thick. Place this into the scorching hot pan and centre it. Take 1/4 of the meat mixture and spread this on top. After 1 to 2 minutes, slide out the Lahmajun onto your work surface and repeat with the other three balls.
What we've done is seal the base and give it a crisp underside. Now all 4 are done, use your peel to slide them all onto the pizza stones on your oven. If you don't have stones, put a heavy tray into the oven to heat up instead.
Bake for 8 minutes.
While this is happening, finish the top and make the salad.
Core the apple but don't peel it. Roughly chop the parsley the dress with the olive oil and pomegranate molasses. Season the use your hands to toss the salad. Taste and adjust the seasoning if necessary.
Finally, heat a pan and toast the pine nuts and cumin until they start to smoke.
Put a tablespoon of this into the salad and mix. When the Lahmajun are finished, take them out and scatter the rest of the nuts over each one.
Place a quarter of lemon on each one, a sprig of parsley and serve with the salad immediately.
